
Free drawing lesson · 6 construction goals
How to Draw a Squirrel, Step by Step
Build a seated squirrel from light oval guides. Shape its ears, overlapping muzzle and hooked tail, then connect the paws and feet. Each goal shows the joins and exactly which guides to erase.
HardThe hooked tail changes direction and width; tapered ear curves need careful control.
You will practise: shaping a hooked tail and tapered ears while keeping the correct edges at each overlap.
Choose paper or screen.
The full lesson is free. Use a pencil, plain paper and an eraser. Follow the pictures below, print the lesson, or use the phone PDF with larger text.
For repeat practice: six checkpoints and reminders on one page. Use the detailed lesson for every construction action and close-up. The complete editions remain below.
No email or purchase is needed. Drawing with a child? Read one instruction together, then leave time to try it. There is no video for this lesson.
Leave room for the whole squirrel
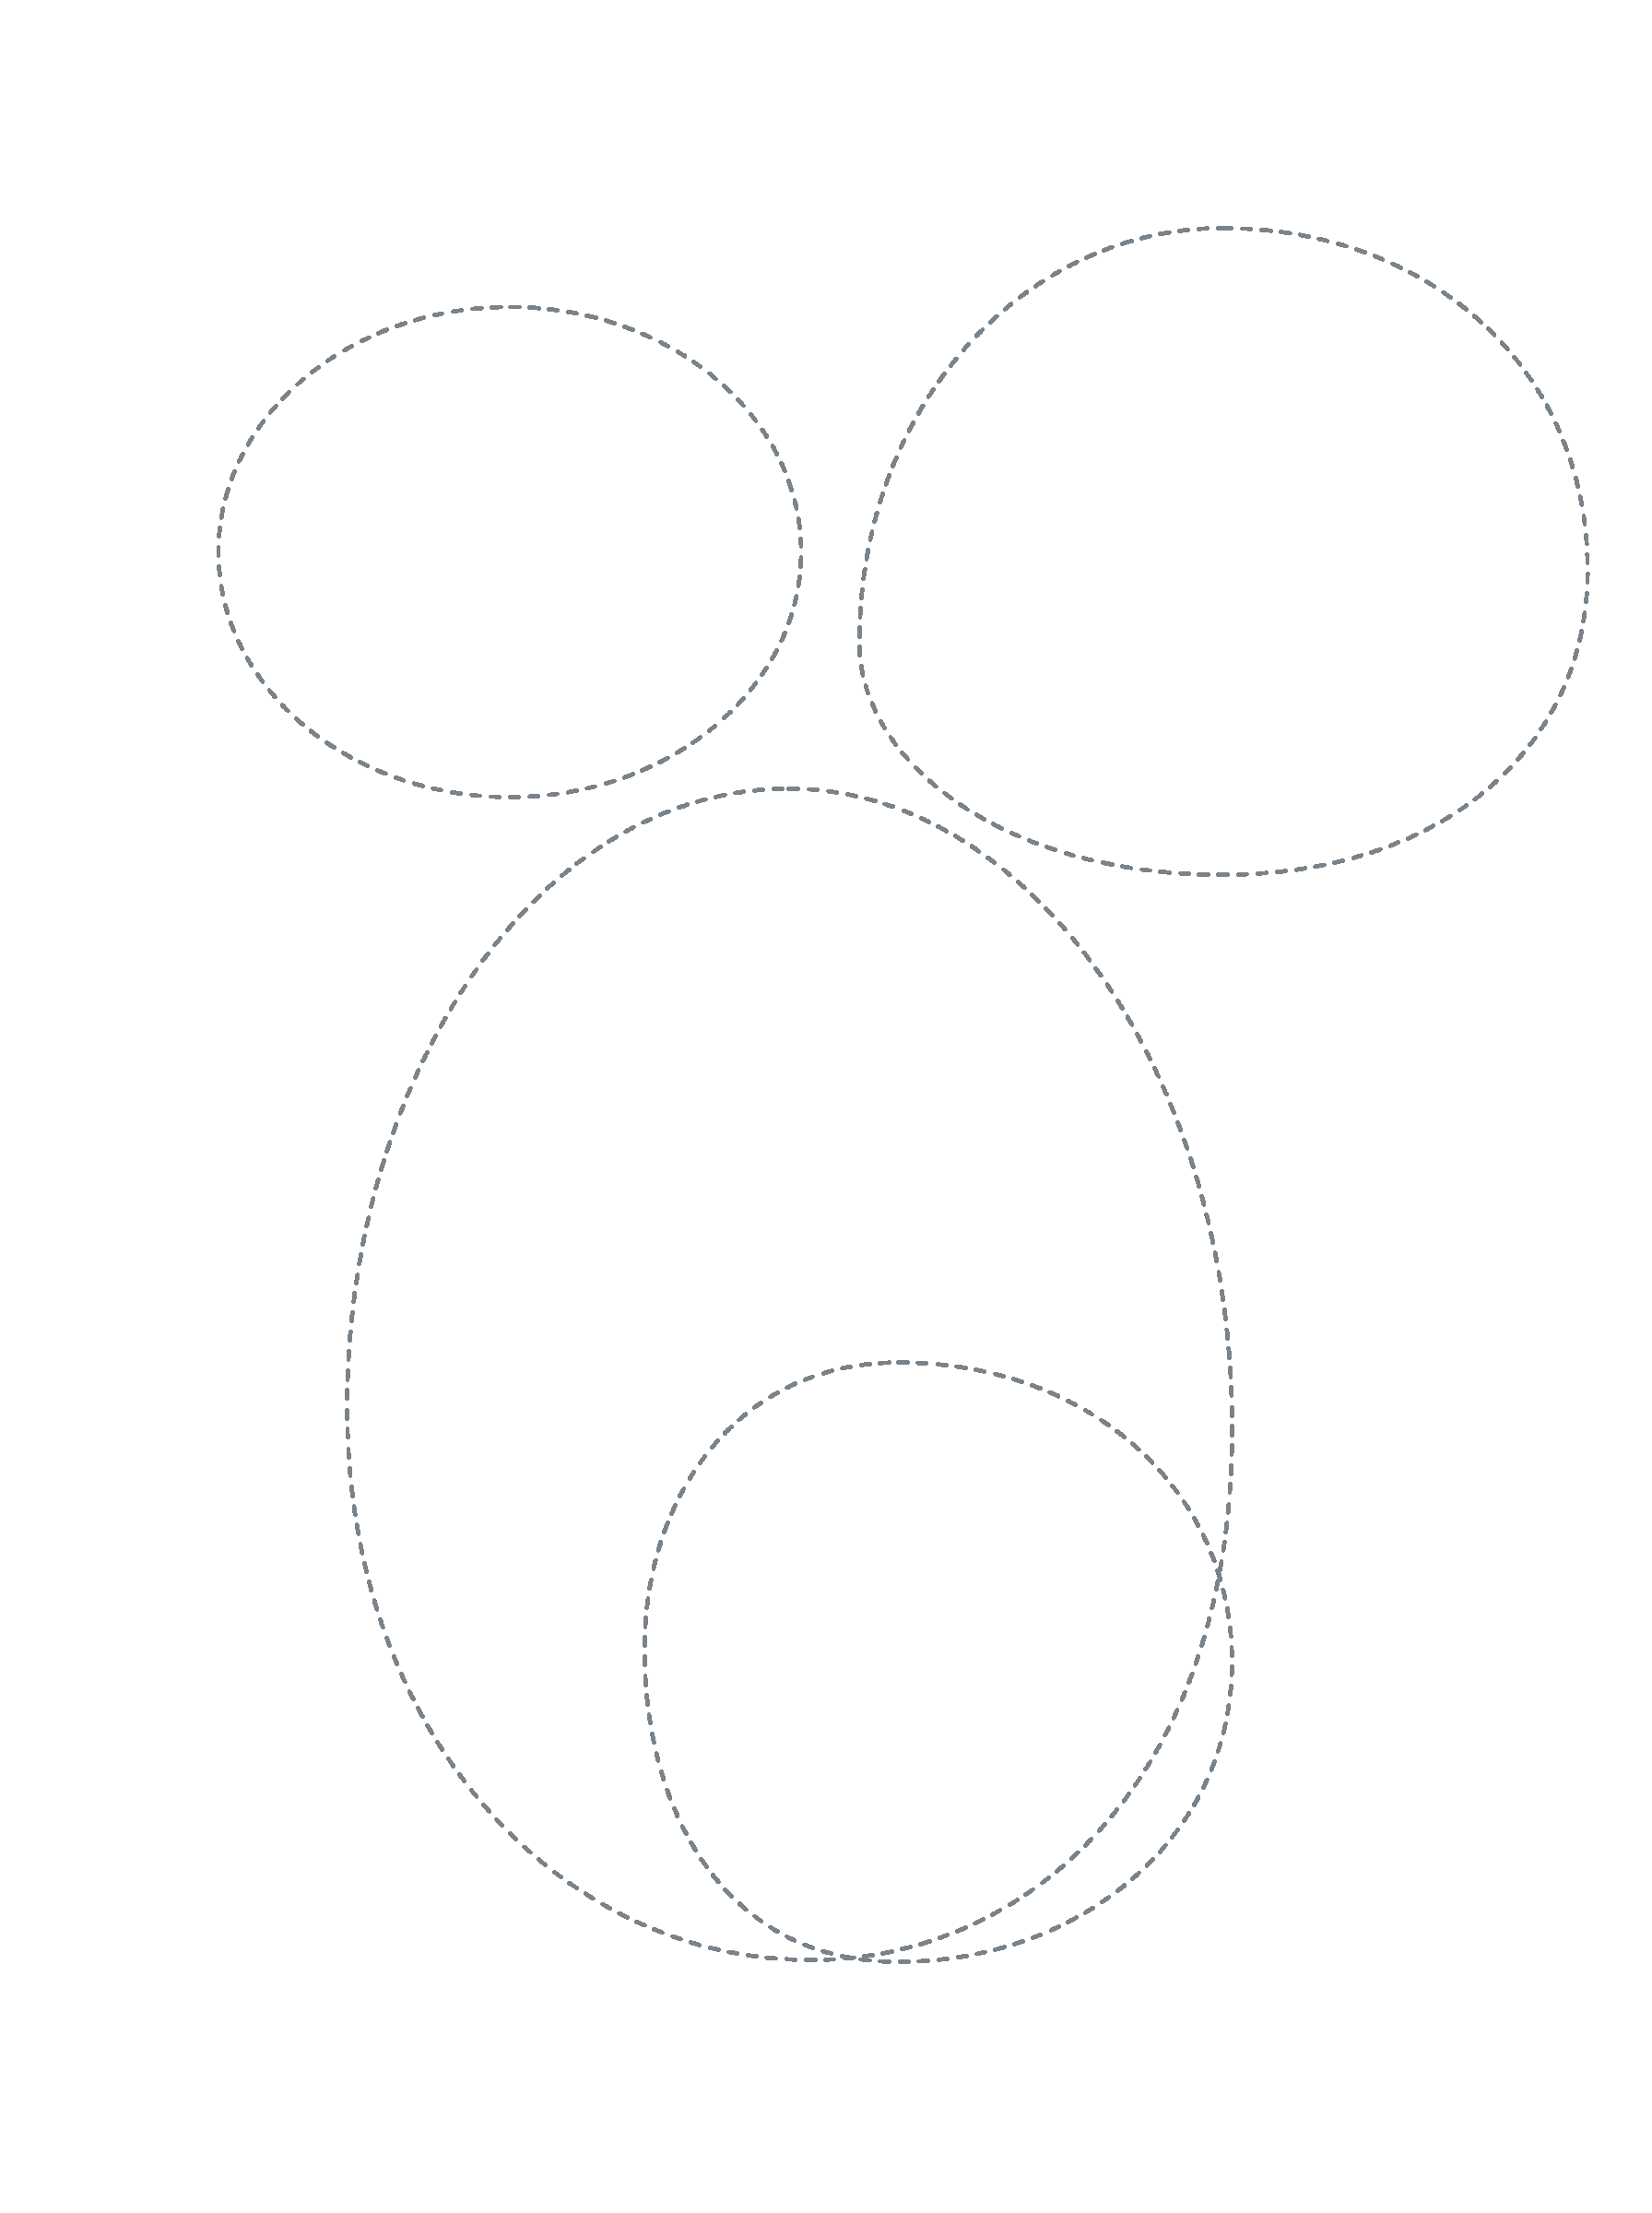
Use a pencil, an eraser and portrait paper. Follow the six goals in order. The overview helps you leave room; each goal shows when to draw its guides. The pictures show the small actions and the exact guides to erase. Start high on the left with a wide head oval. Leave room above for the ears, more than a head-width to the right for the tail, and about two and a half head-heights below for the body and feet. Draw guides lightly. Check the whole arrangement before adding the small face shapes.
Preview the four main shapes
Use this overview to leave room for the head, body, haunch and tail. Draw each guide when its goal introduces it.
Enlarge this picture ↗Check: Before adding details, check that the tail cap reaches about as high as the ears and the body is wider than the head. If space is tight, move only the light guides now.
Jump to a construction goal
Optional repair helpBuild your squirrel one part at a time.
Gray dashes: light guides. Black: keep. Orange: draw now. Green labels and X marks are helpers, not drawing marks. Open any picture for a closer look, then use Back to return to the lesson.
Goal 1 of 6
Shape the head and ears
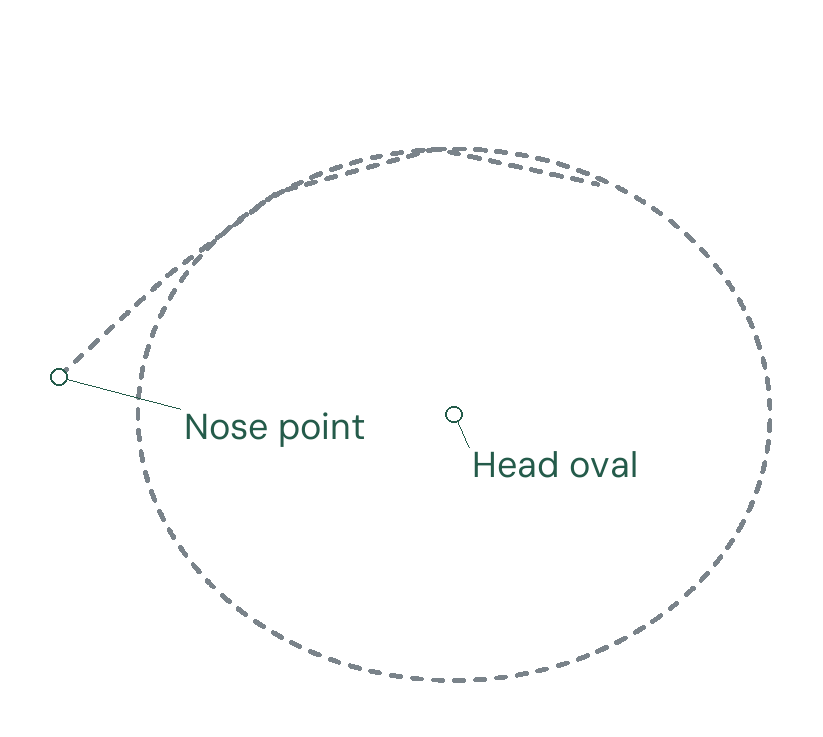
Place the head and the forward nose point
Lightly draw a wide oval high on the left. Mark the nose point just beyond its left edge, slightly above halfway down. Add the bent guide from that point to the forehead and across the top. Leave room above for ears, to the right for the tail and below for the body.
Enlarge this picture ↗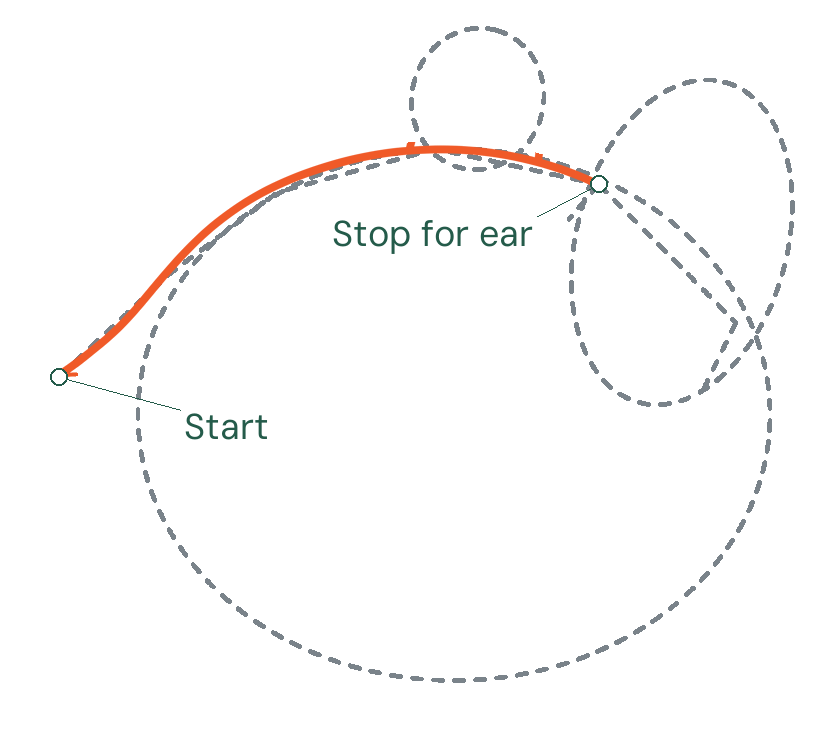
Round the forehead and place the ears
Add a narrow oval above the crown for the far ear. Put a taller, tilted oval on the right for the near ear, with its lower end inside the head. The marked meeting point is the forehead stop. From the nose point, round the forehead to that stop.
Enlarge this picture ↗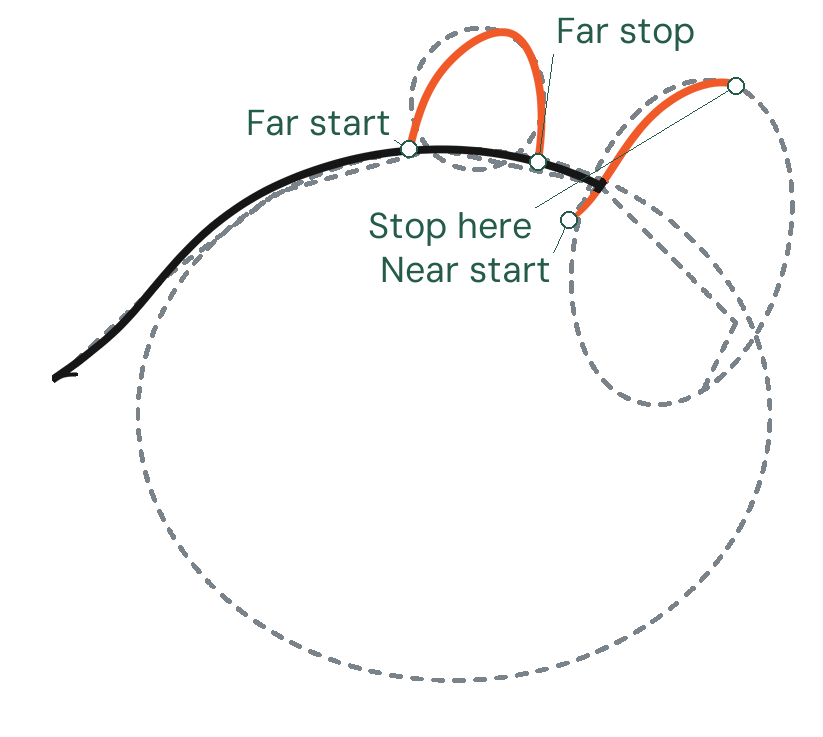
Draw the far ear and start the near ear
Round over the small oval from one crown mark to the other. Its bottom stays hidden behind the forehead. For the near ear, start at the short front root, curve up the tilted oval and round its top. Stop at the top-right mark; keep the return side light.
Enlarge this picture ↗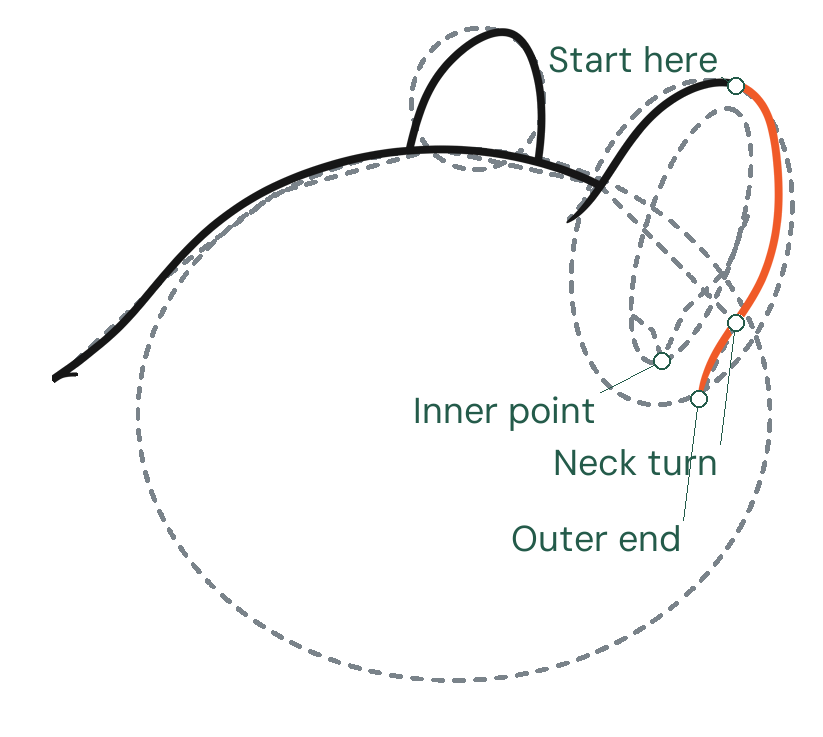
Return down the near ear
Continue from the top-right mark down the back of the ear oval. Turn inward at the neck mark, then taper to the lower end inside the head. Lightly add a smaller oval inside this ear and mark its lower turning point. Its upper-right section will remain open.
Enlarge this picture ↗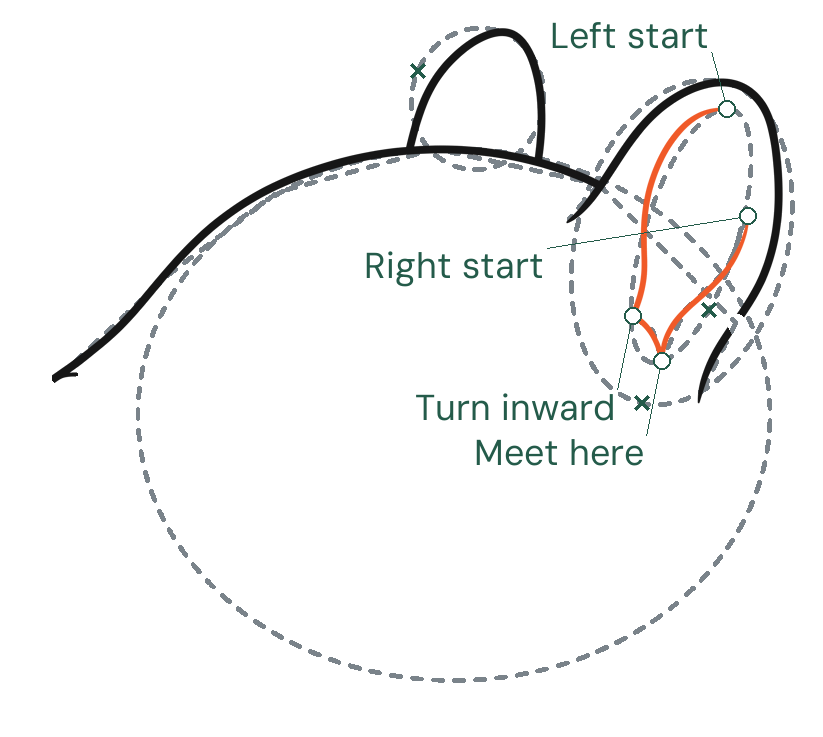
Round the inside and mark only the guides to erase
From the inner top mark, follow the left of the small oval, turn gently inward and curve to the lower point. From the right mark, round down to that same point. Keep the upper gap open. Mark the dashed forehead bridge and all ear guides for erasing; keep the large head oval.
Enlarge this picture ↗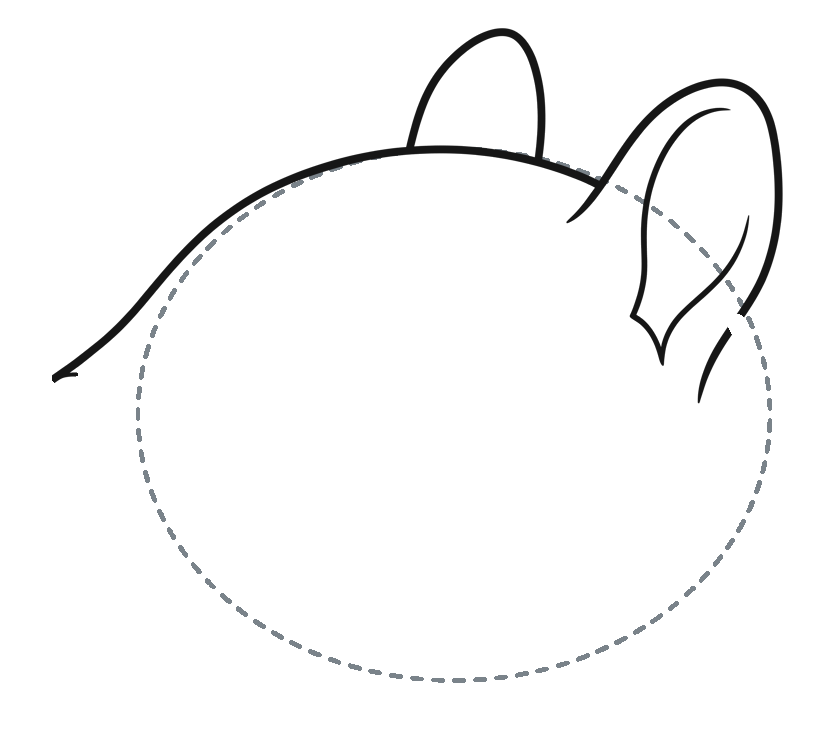
Keep the open ear roots
Erase the marked forehead and ear guides. Keep the solid forehead and both ears, including the near ear’s inner point and open upper gap. Keep the large head oval light. Do not join across either ear base or add an inner line to the far ear.
Enlarge this picture ↗Check: The near ear is taller and tilted. Keep its inner upper gap open, both ear bases open and the broad head oval light.
Goal 2 of 6
Build the rounded muzzle
Place the overlapping muzzle forms
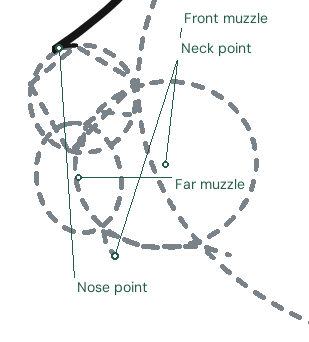
Around the nose point, place a small light nose oval and mark its soft bottom point. Overlap a larger muzzle oval below and right, with a smaller oval behind on the left. Add the short nose and mouth guides. From the bottom of the front muzzle, mark the short bend to the front-neck point.
Enlarge this picture ↗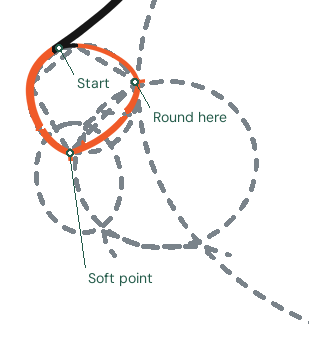
Round the nose and narrow its bottom
Start where the forehead meets the small oval. Round its top and right side, then curve down to the soft bottom point. Return around the left side to close the nose. The light corners guide the change in direction; keep them rounded rather than making a sharp triangle.
Enlarge this picture ↗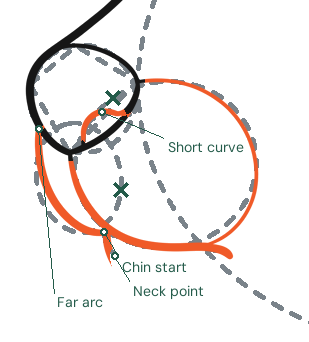
Join the muzzle and keep its overlaps
Round the inner nose guide. Trace the large muzzle outside the nose, continuing its bottom into the mouth. Draw only the exposed crescent of the far muzzle. From the bottom of the front muzzle, bow down along the short guide to the front-neck point. Mark the dashed guides for erasing.
Enlarge this picture ↗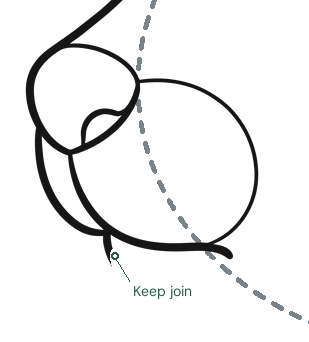
Keep the nose in front
Erase the marked nose, muzzle, mouth and short chin guides. Keep the solid nose, its inner curve, the two exposed muzzle contours, the mouth and the short join to the front-neck point. Keep the broad head oval. No hidden oval arc should cross a front form.
Enlarge this picture ↗Check: The nose is in front of both muzzle forms. Keep only the exposed far crescent and the short chin join; the head oval stays light.
Goal 3 of 6
Place the eye and cheek
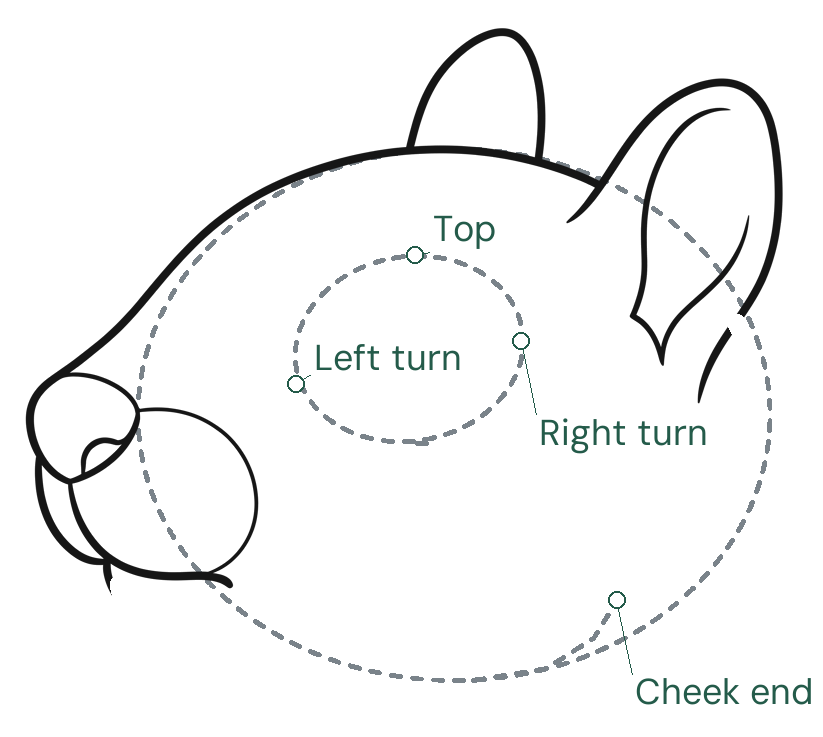
Place the eye patch and cheek turn
Above and behind the muzzle, draw a light oval for the eye patch. Mark its top, bottom and two side turns; the left turn sits a little lower than the right. Below the eye, add a short bent guide for the cheek. Keep this guide inside the head oval.
Enlarge this picture ↗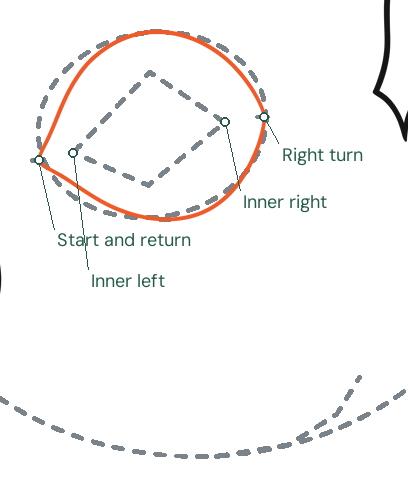
Round the patch and plan the eye opening
From the lower-left mark, curve up around the oval to the top and then down to the right mark. Round underneath and return to the left mark. Inside this patch, lightly join four marks into a slanted diamond. Its left and right corners locate the eye opening.
Enlarge this picture ↗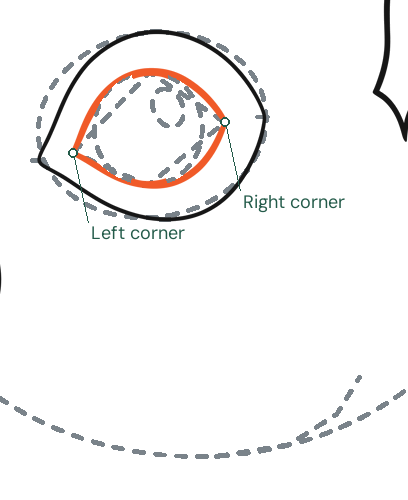
Curve the eye opening
Curve from the left diamond corner over the top mark to the right corner. Return beneath the lower mark to the left corner. Inside this opening, draw a light circle that touches its upper and lower curves. Place a small tilted oval near the circle’s upper-right side.
Enlarge this picture ↗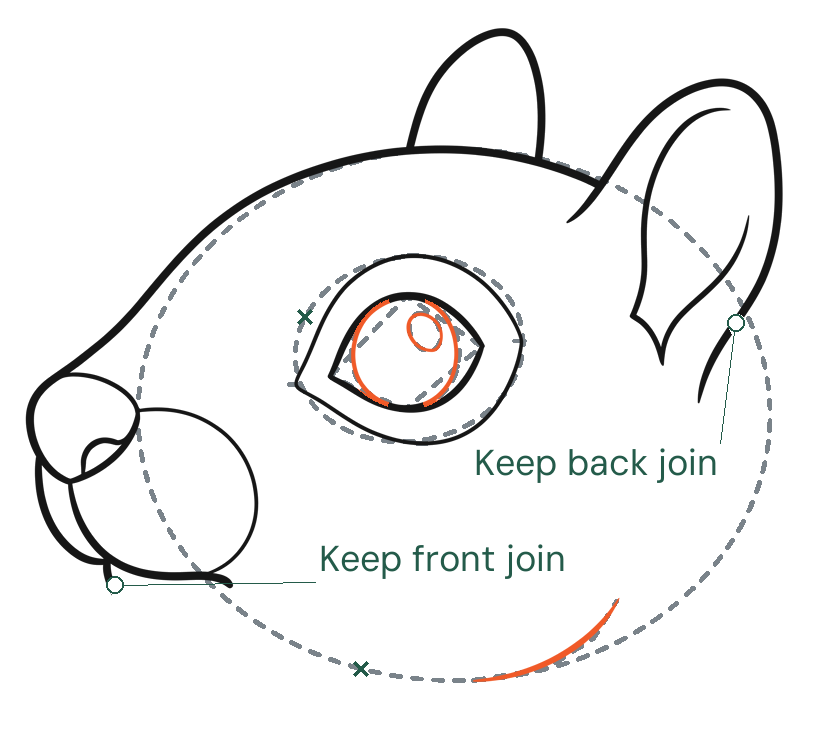
Finish the eye and cheek, then choose the last guides
Draw the large circle and small tilted oval, leaving both unfilled. Round the bent cheek guide into one short curve, with both ends inside the head. Mark the head oval, eye guides, diamond and cheek guide for erasing. Keep all solid facial lines and both neck joins.
Enlarge this picture ↗Eye detail
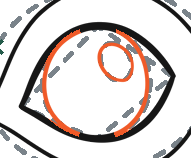
Eye detail: draw both round forms and leave them unfilled.
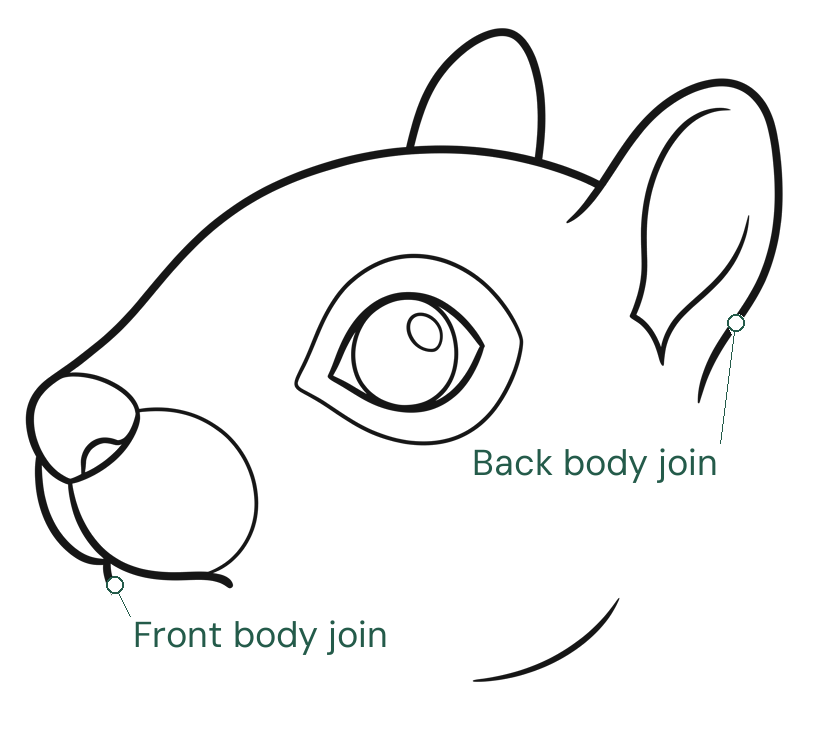
Keep the finished head ready for the body
Erase only the marked head and face guides. The ears, muzzle, eye and cheek stay in place. Leave the two neck joins open for the body: one below the muzzle and one behind the near ear. The head is ready; the squirrel is not finished yet.
Enlarge this picture ↗Check: Leave both round eye forms unfilled. After cleanup, the two neck joins stay open for the body.
Goal 4 of 6
Reshape the torso
See where the body joins the head. These three views keep the whole pose at the same scale; follow the larger construction pictures just below.
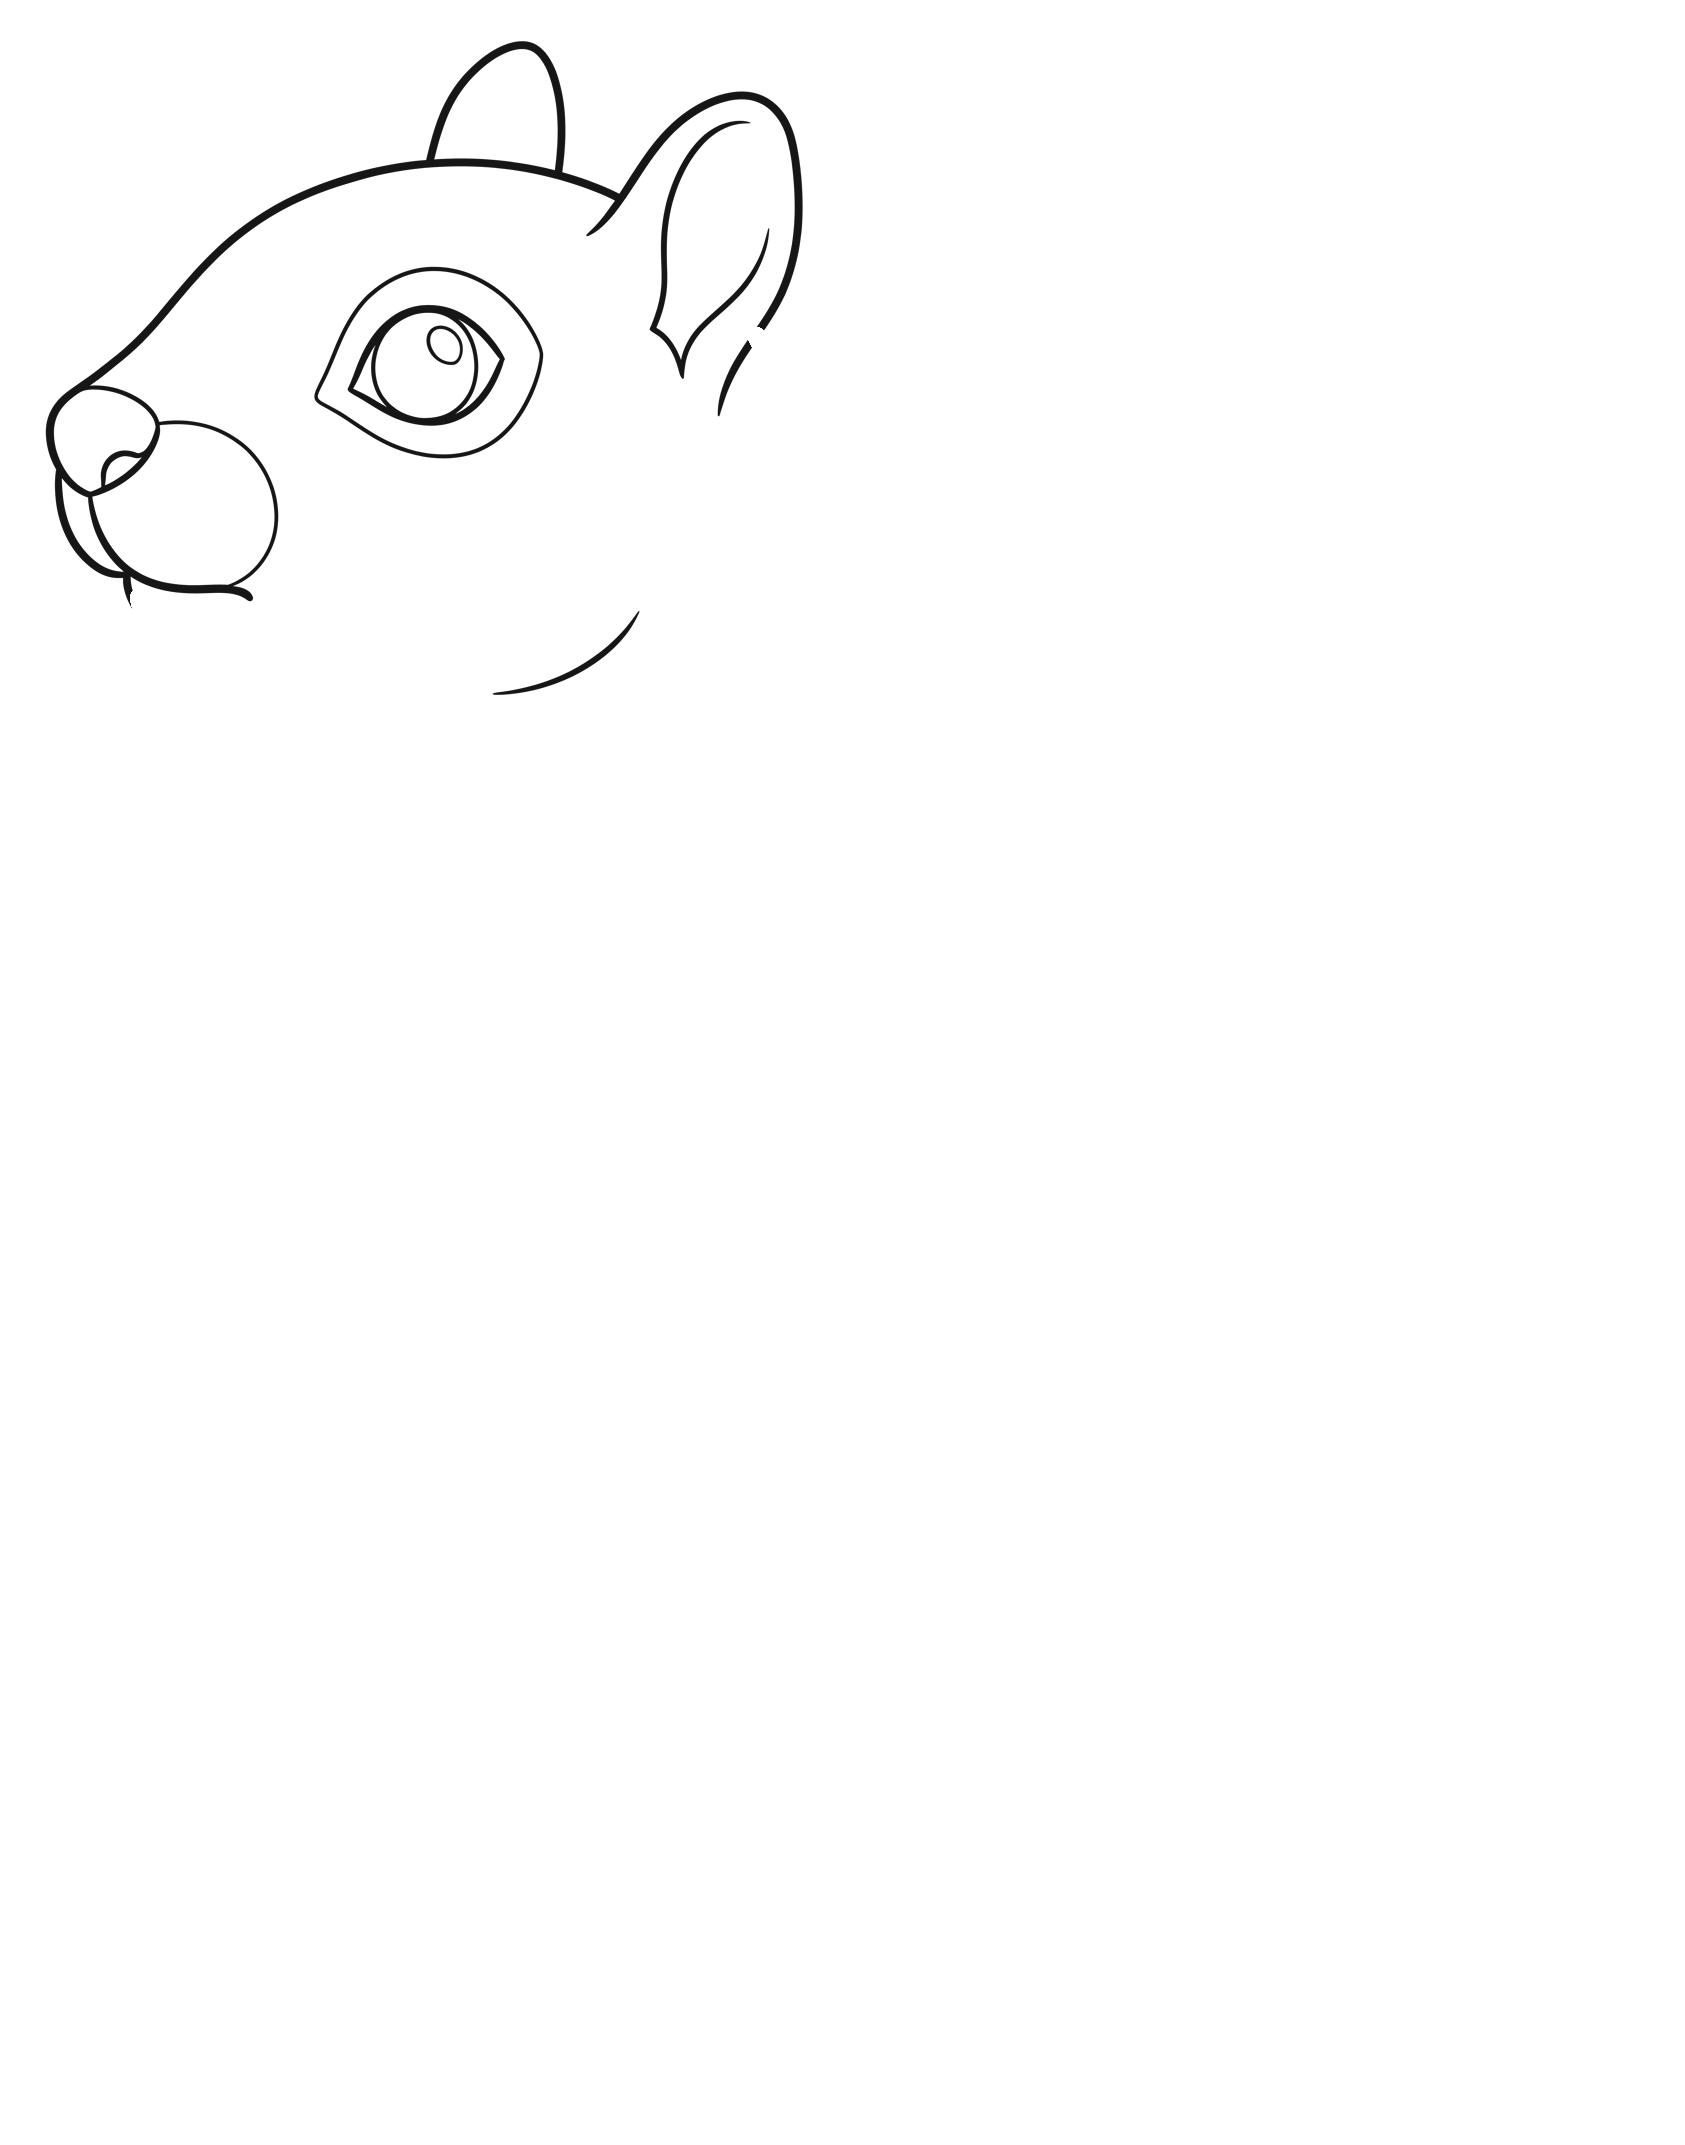
Keep the finished head in place
The two open neck joins will meet the body. This view keeps the head at the same size and position.
Enlarge this picture ↗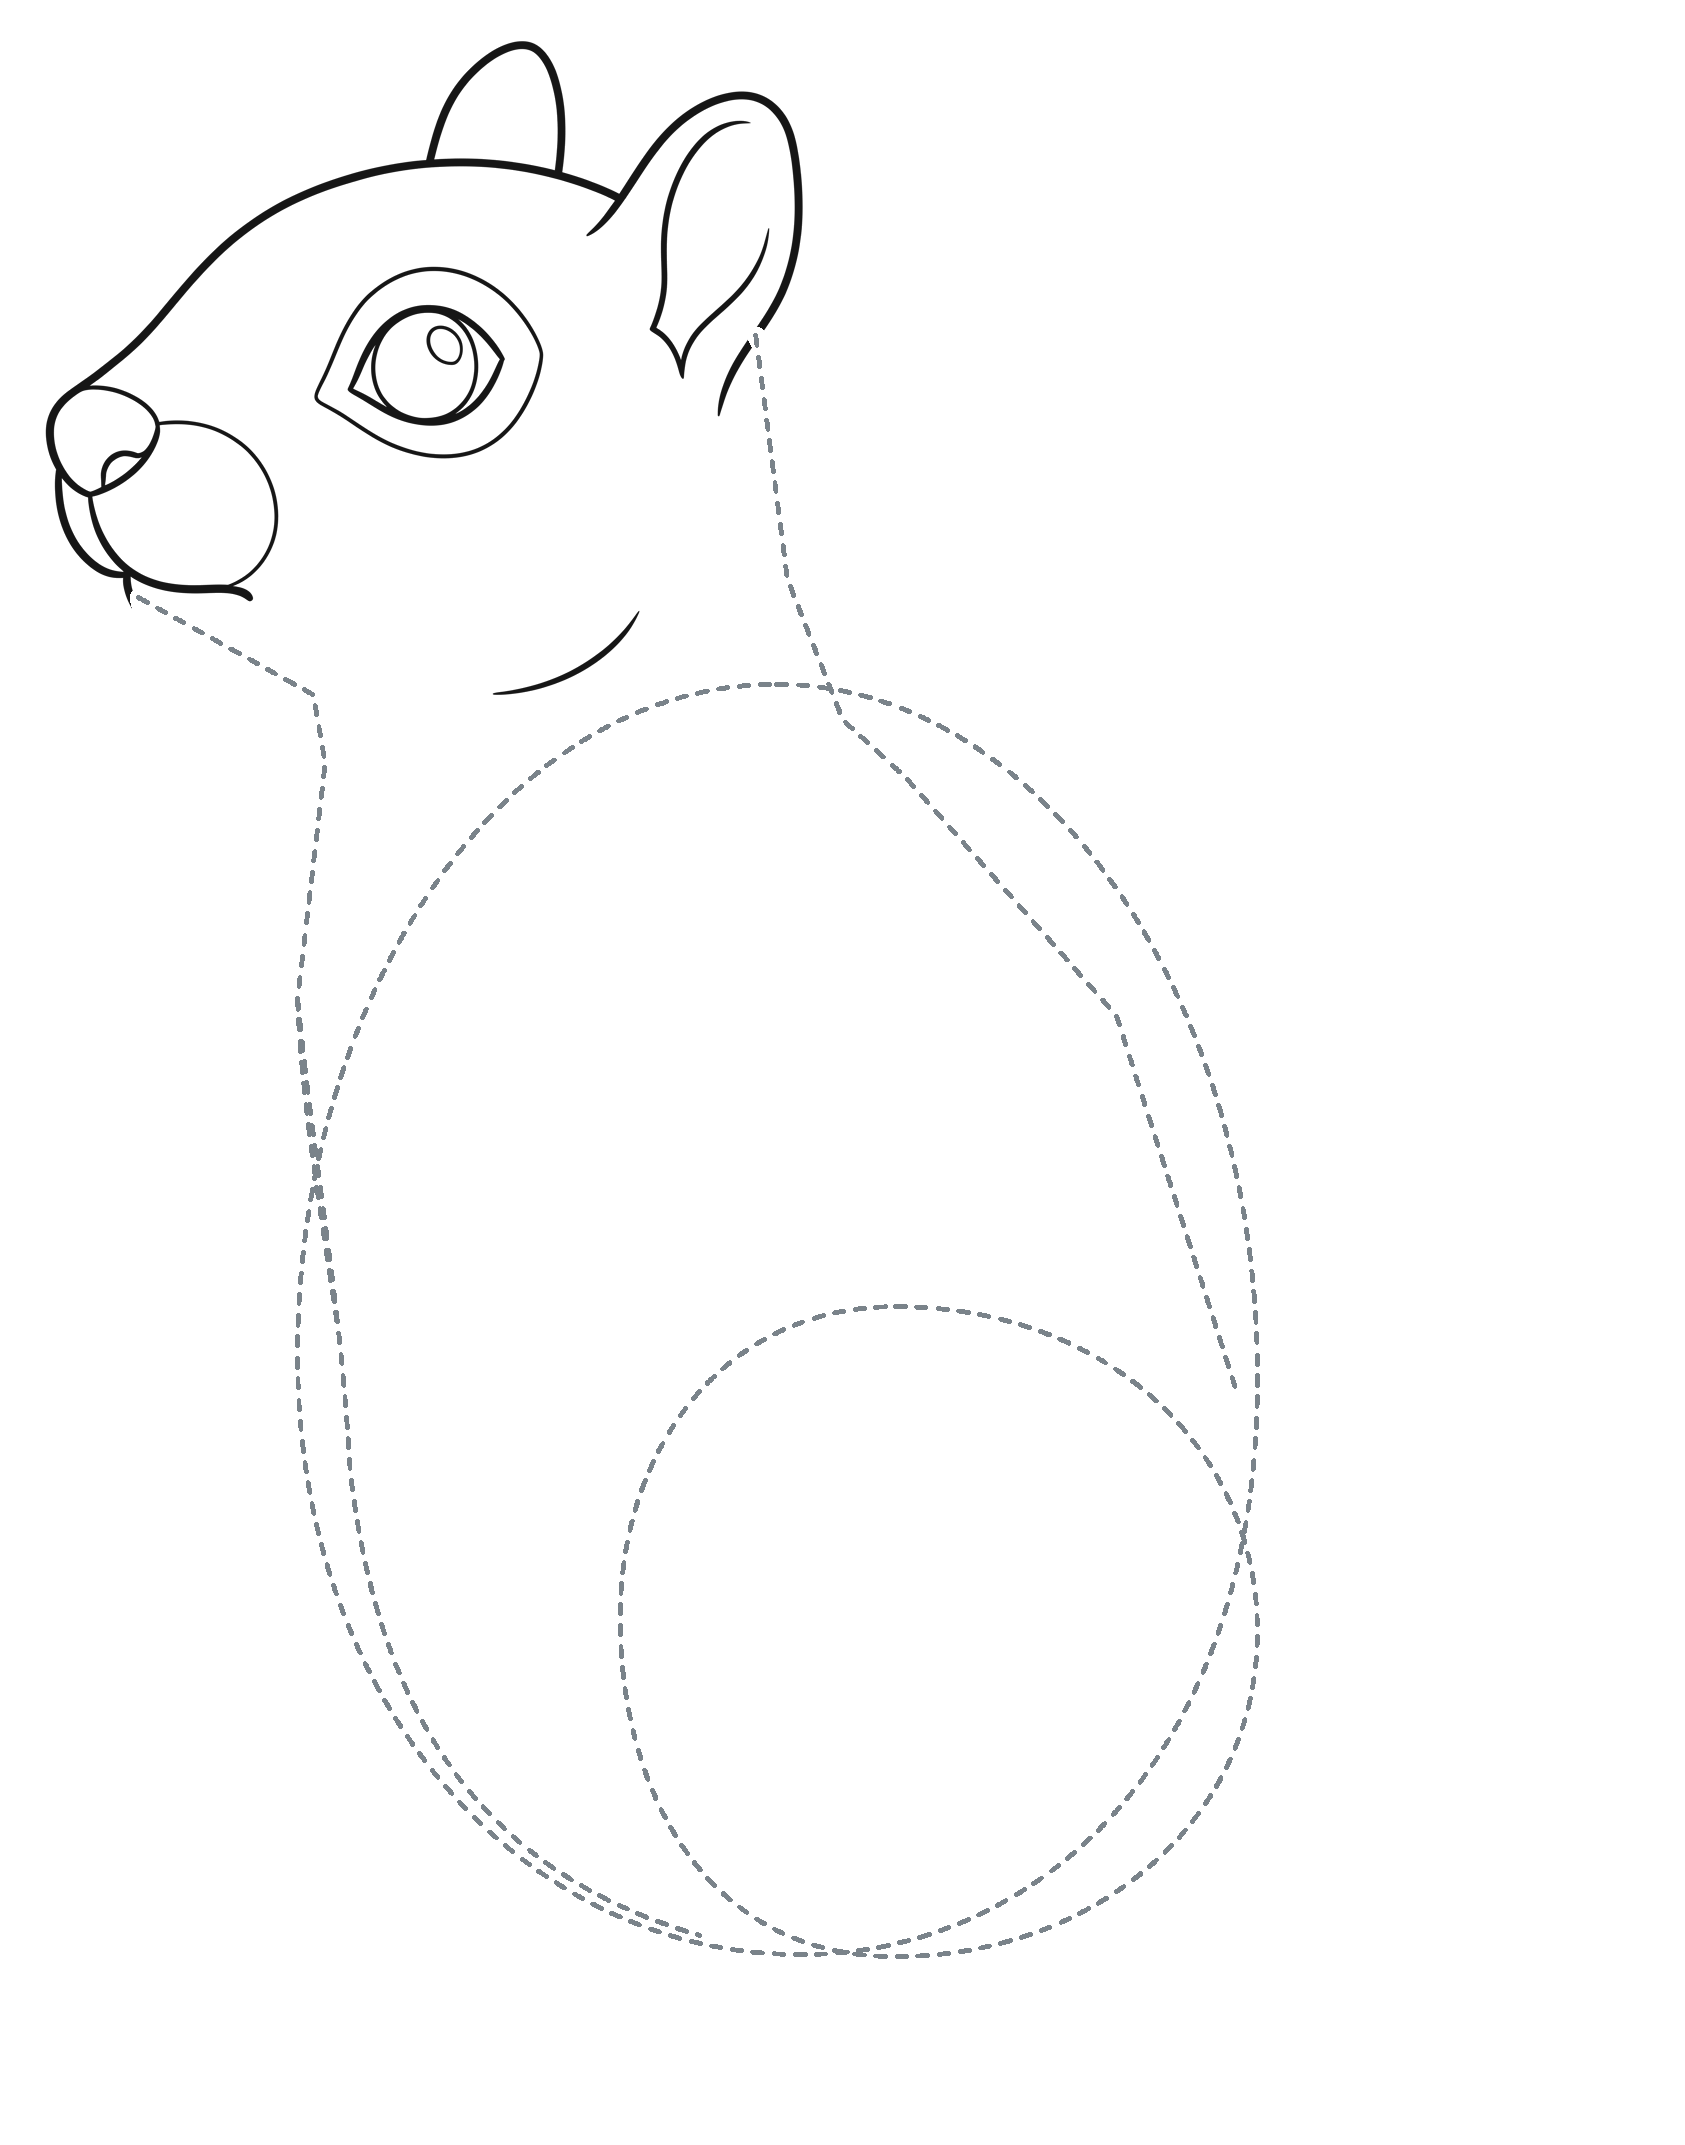
Place the body below the head
Compare the body and haunch guides with the head before following the larger pictures below.
Enlarge this picture ↗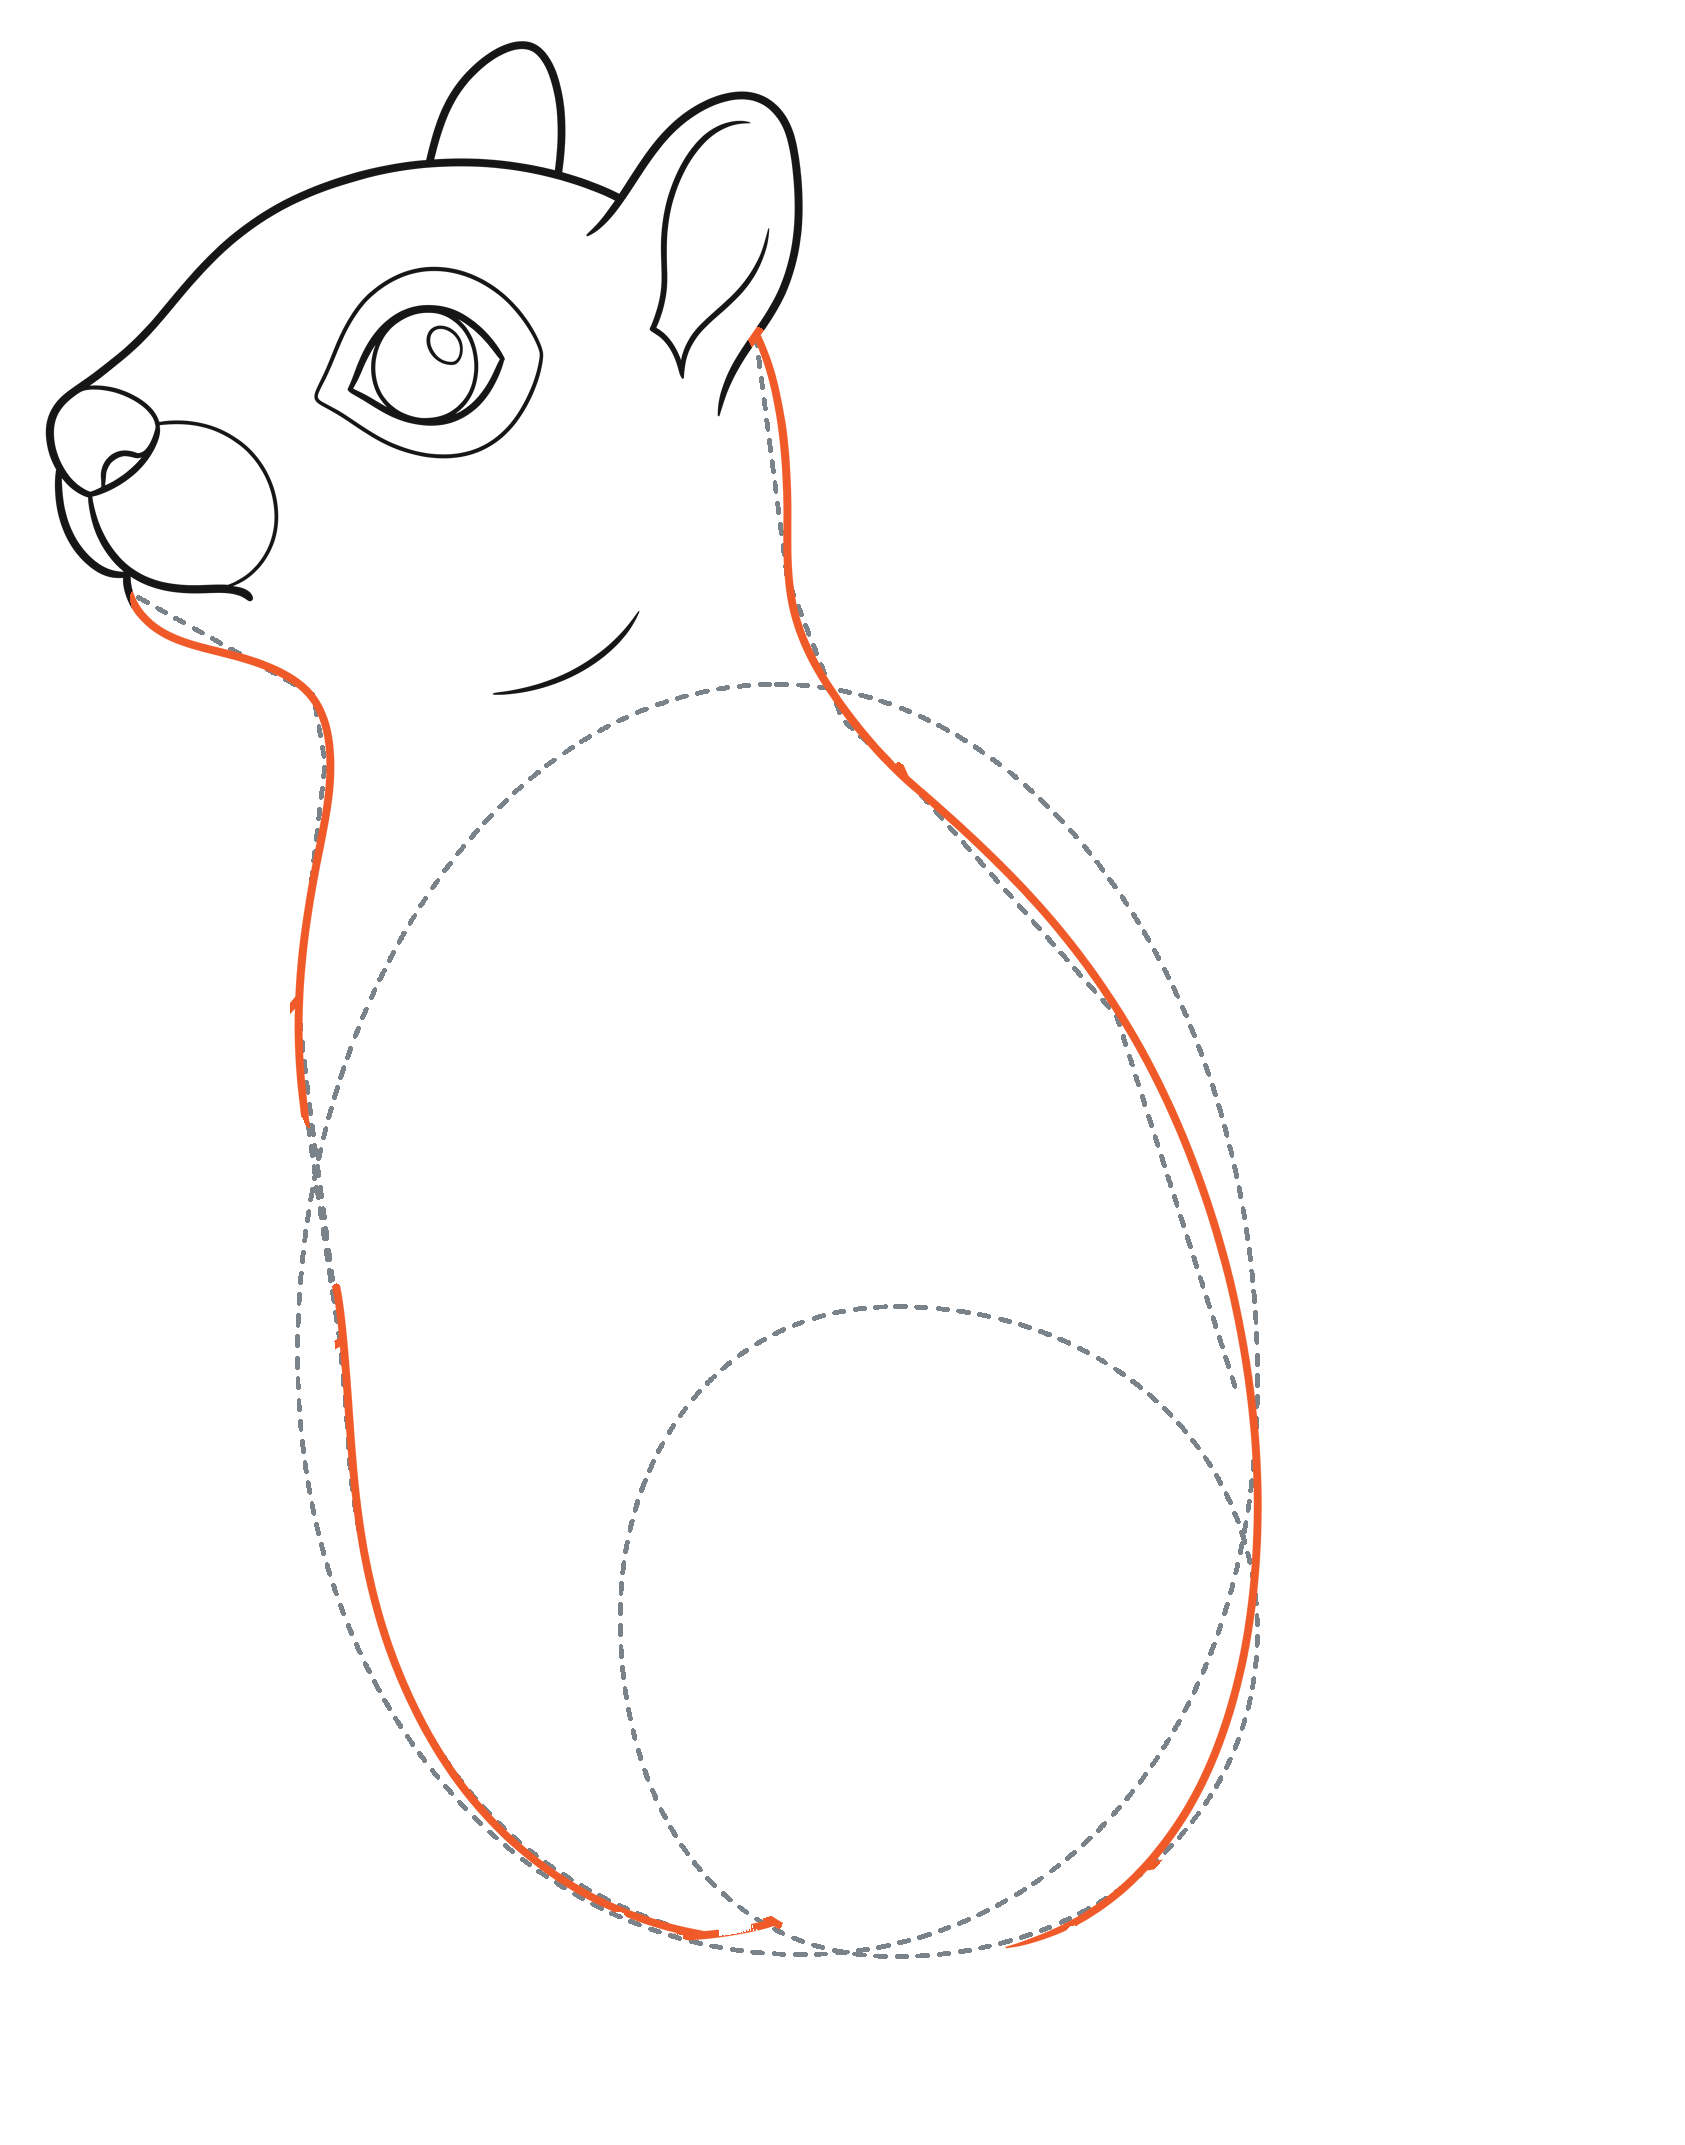
Connect the chest and back
The larger pictures below show how the light guides become the chest and back. Keep the head in the same place.
Enlarge this picture ↗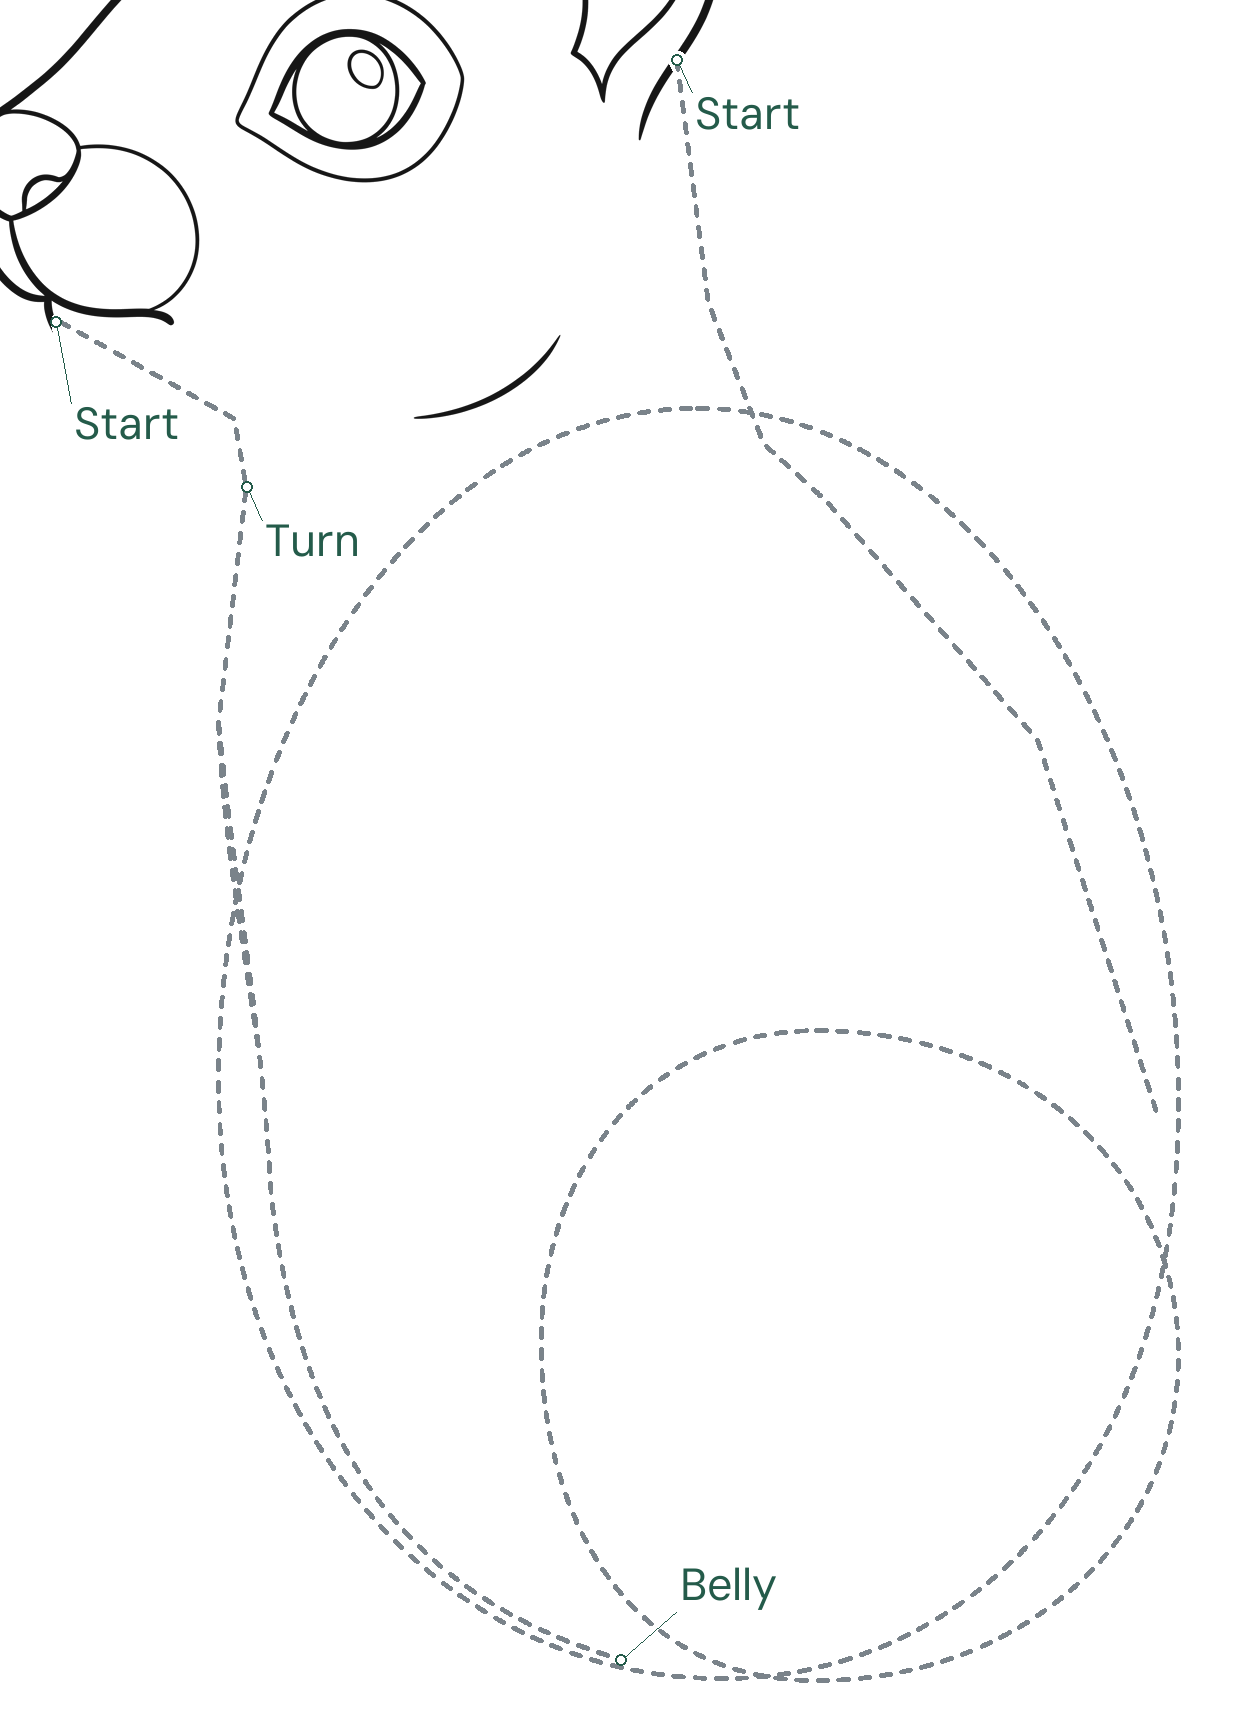
Place the body and mark the neck turns
Use the head you have just drawn. Lightly draw a tall body oval below it and a smaller haunch oval low on the right. Mark the front neck bend and the sloping back. The light chest guide continues behind the place where the paws will go.
Enlarge this picture ↗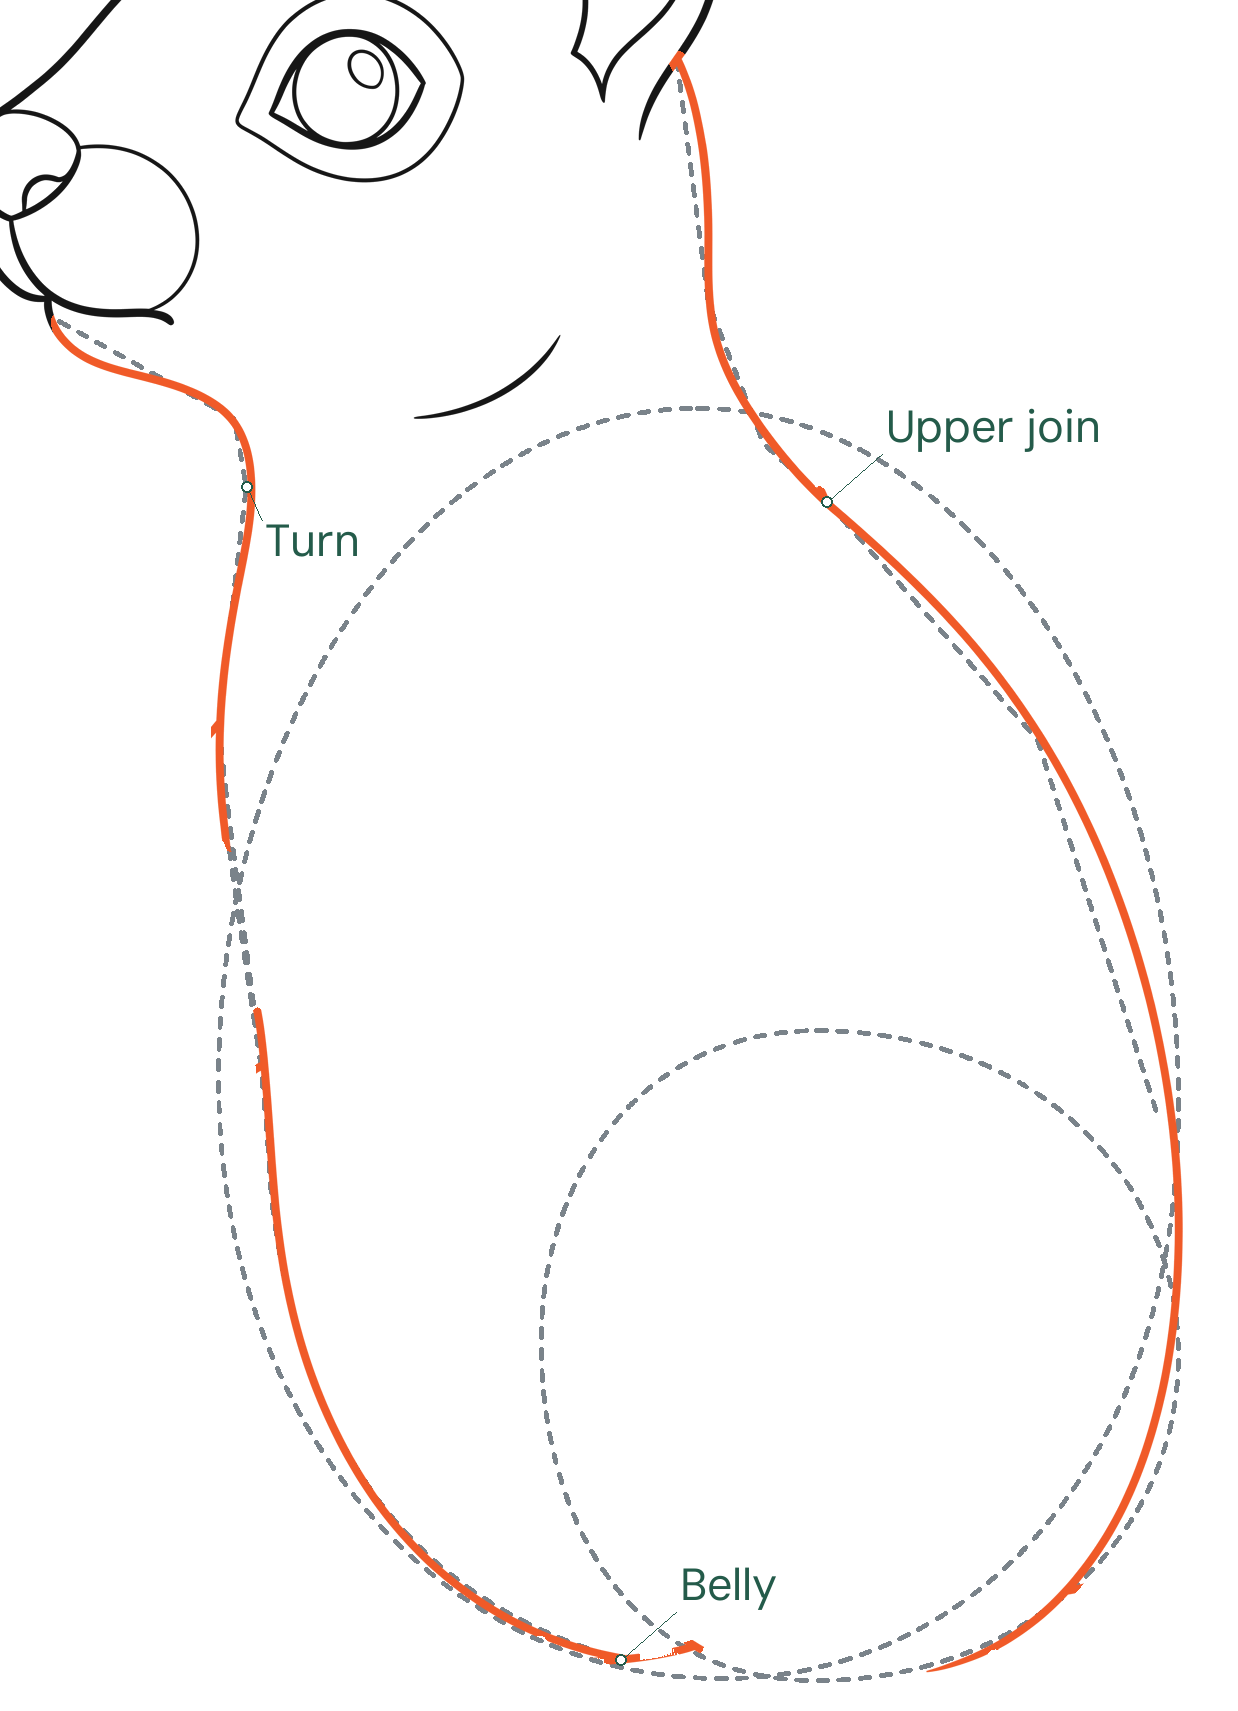
Reshape the oval into the chest and back
From the chin, curve out to the neck bend, then turn inward toward the chest mark. Below the future paws, bow down to the belly turn. From behind the ear, bend out through the upper tail mark and around the back. These new curves replace the body oval; they do not follow every part of it.
Enlarge this picture ↗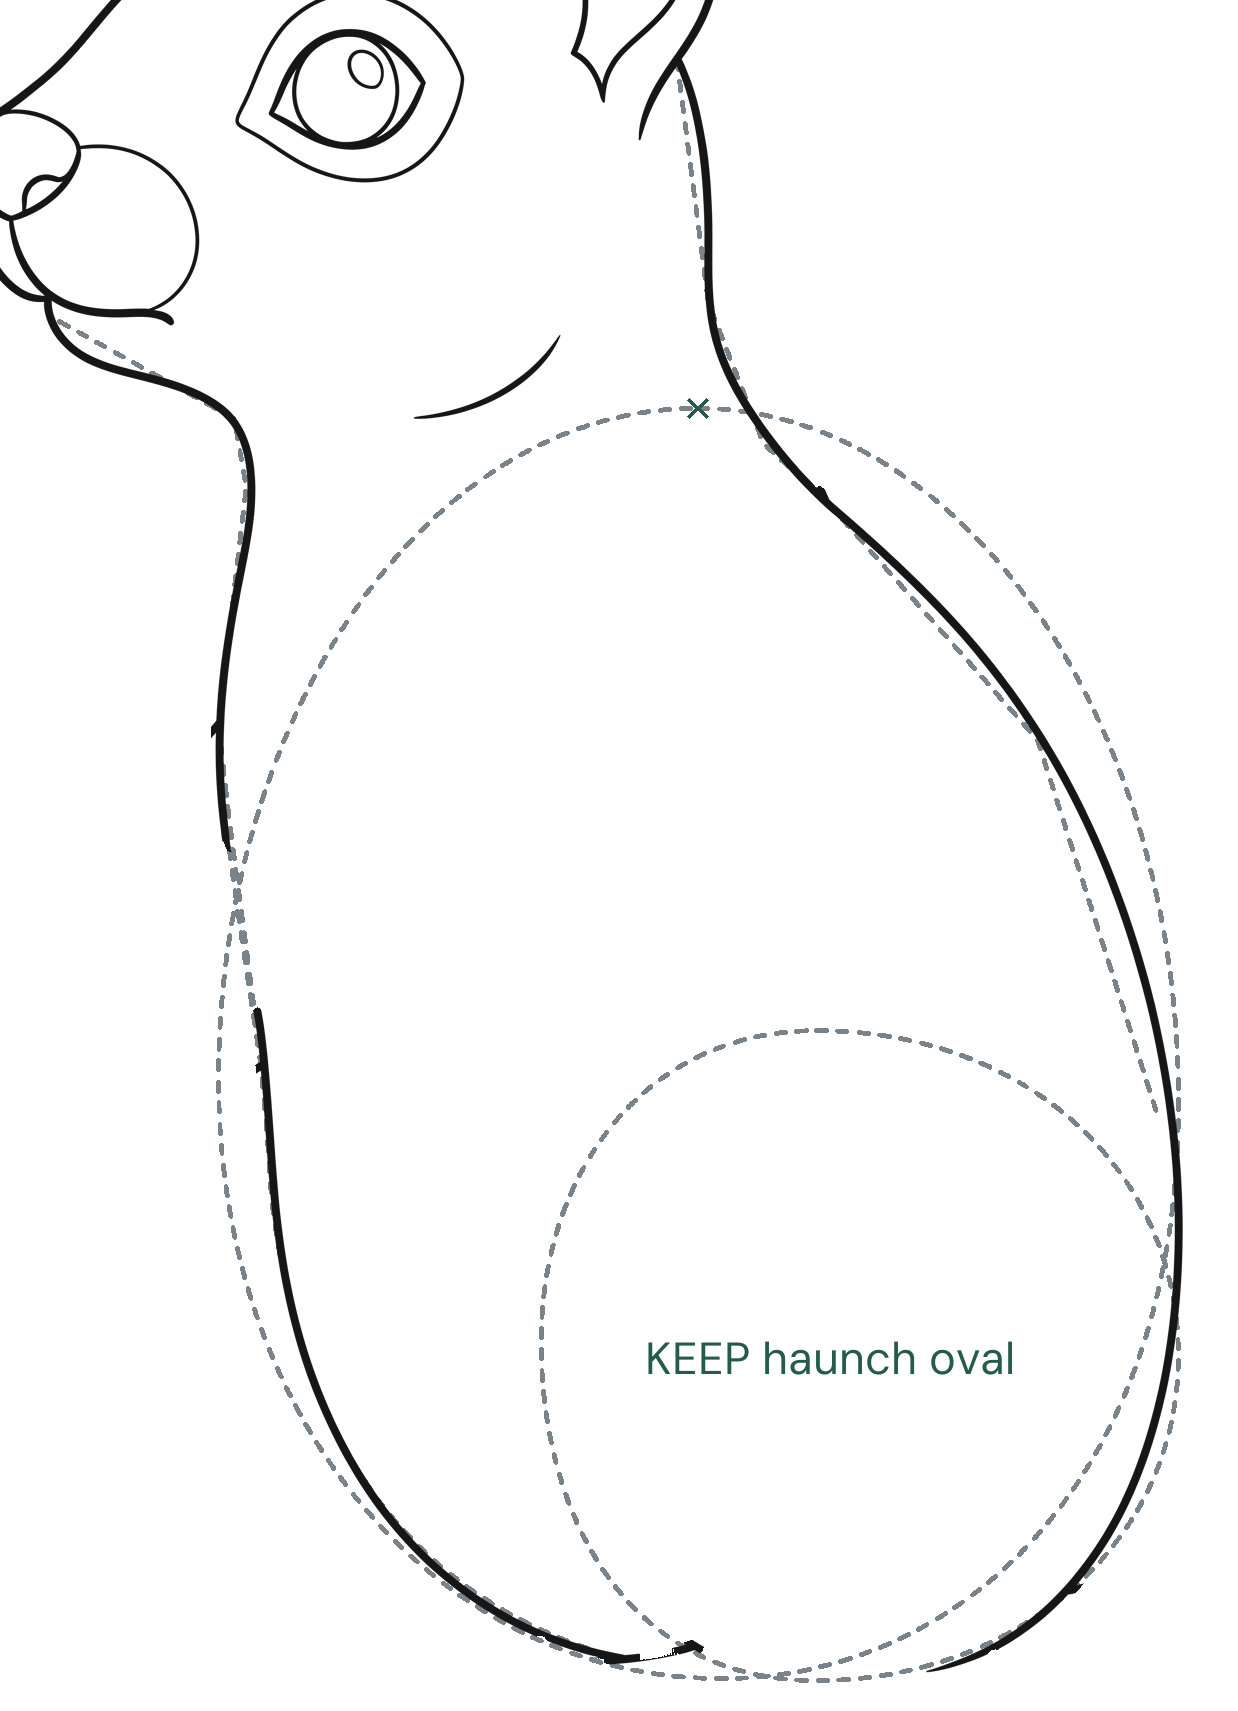
Before: choose the temporary torso lines
Erase the large body oval and the dashed neck, back and belly guides. Erase the light chest continuation where the paws will cover it. Keep both solid body edges. Keep the smaller haunch oval for the leg joins.
Enlarge this picture ↗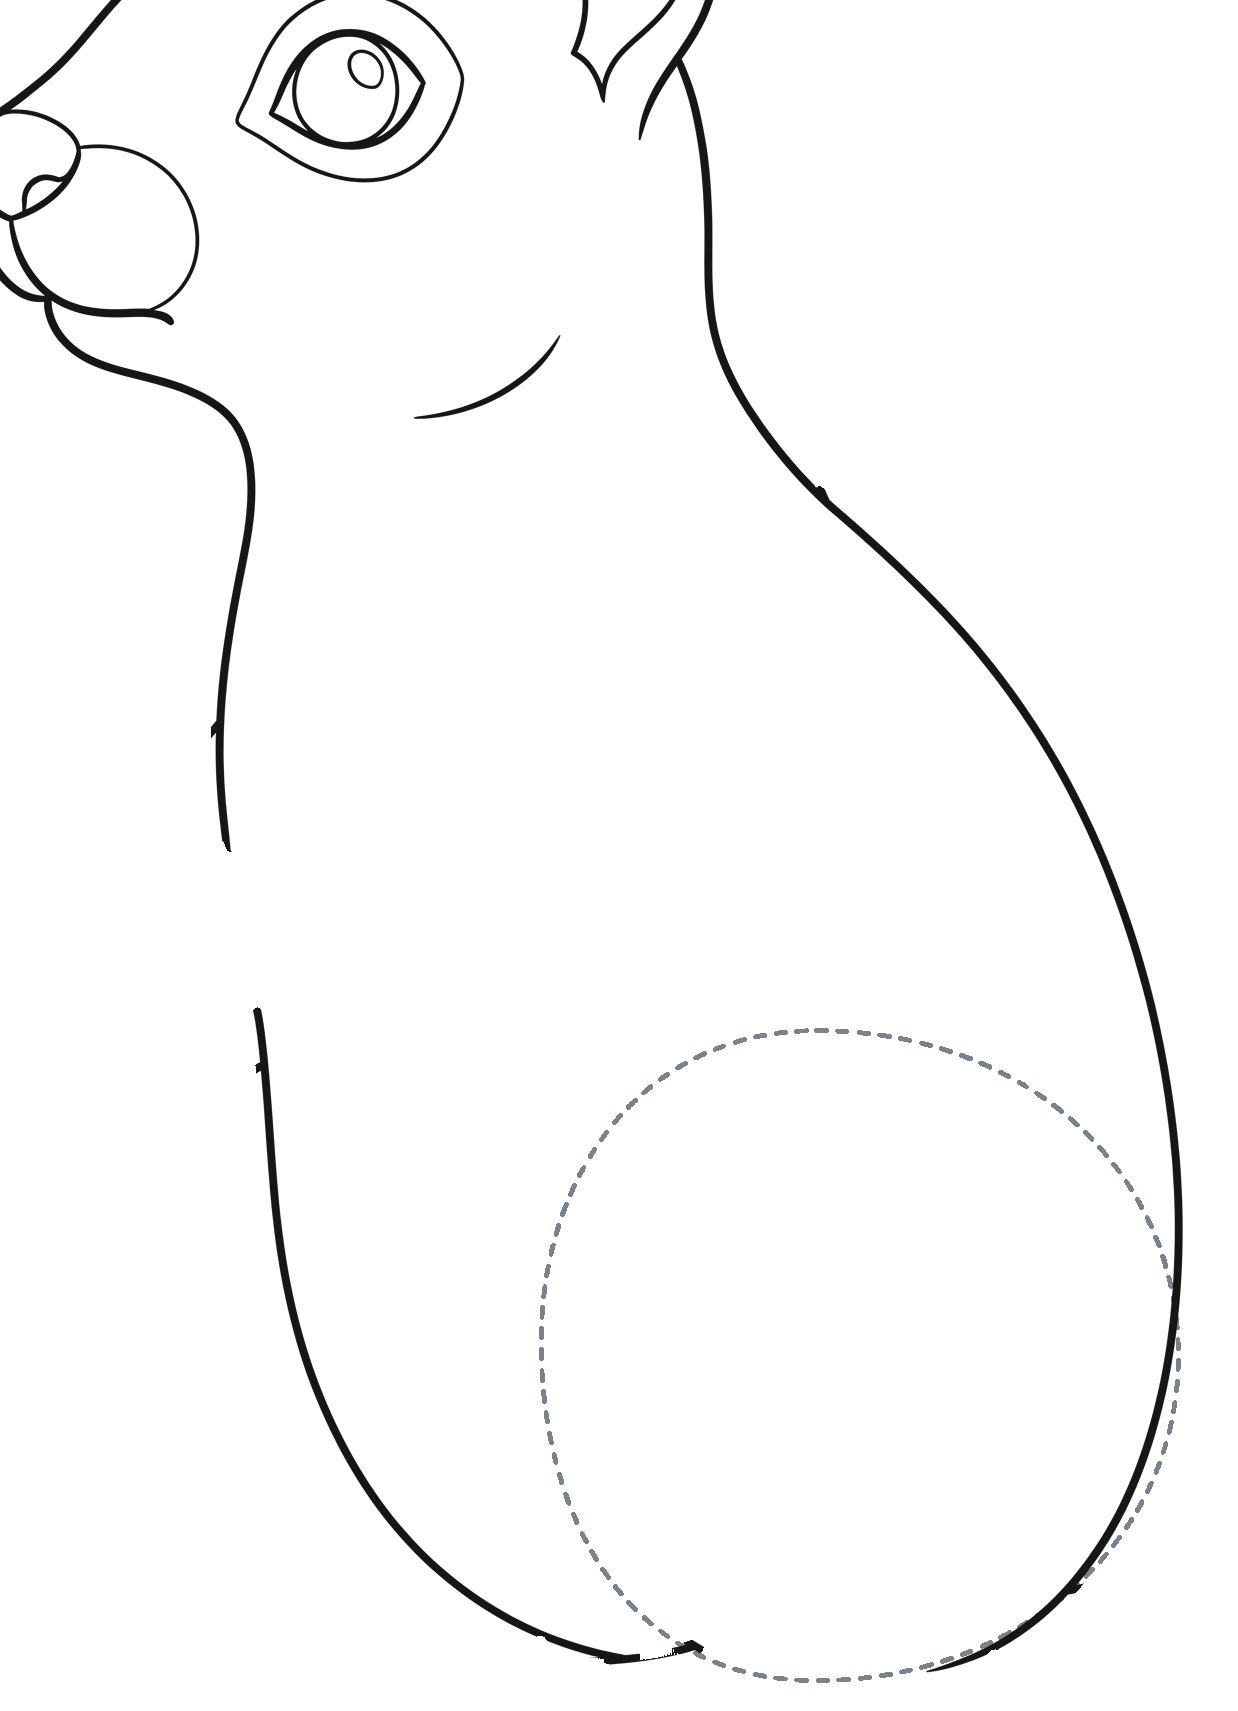
After: keep the reshaped body
The chest is narrower than the lower body. Keep the gap reserved for the paws and the haunch oval. The body stays in exactly the same position when its guides disappear.
Enlarge this picture ↗Check: The chest is narrower than the lower body. Keep the paw gap and the complete smaller haunch oval for the leg joins.
Goal 5 of 6
Build the hooked tail
Plan the high tail and its notch
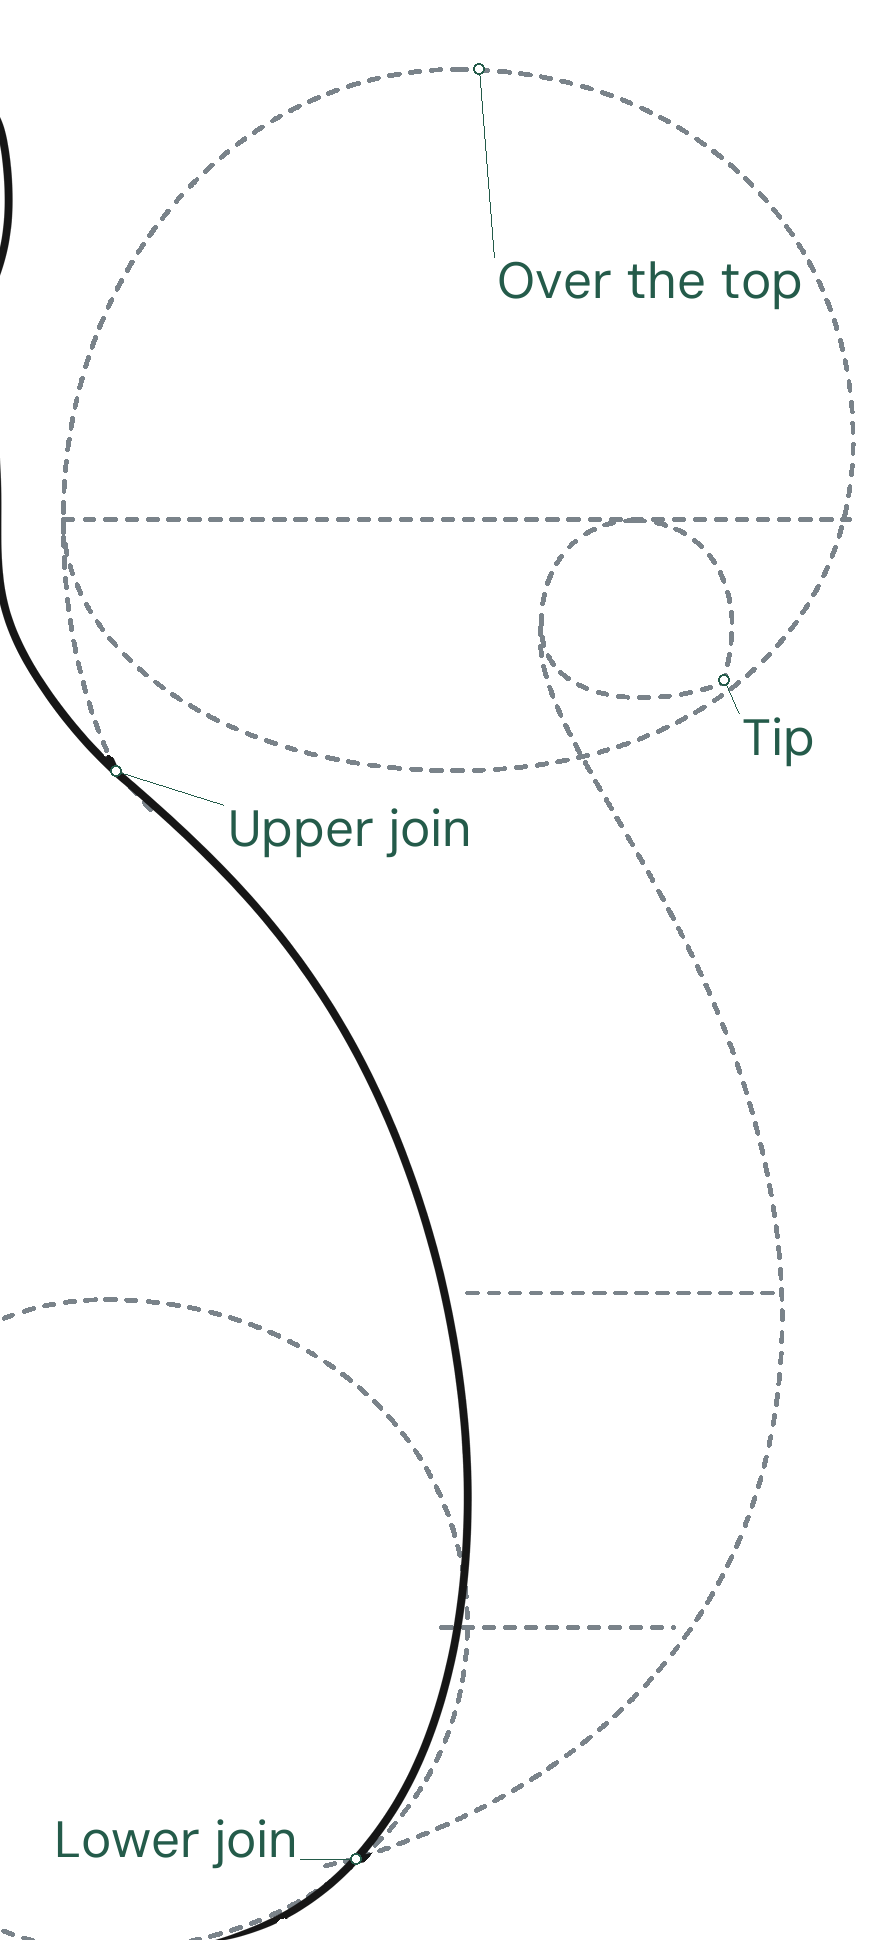
Put a large oval above and behind the back. Add a small oval for the inward notch at its lower right, then a long bowed guide down to the low tail mark. Mark both tail attachments. The top bar spans the large oval; the two lower bars mark the space between the back and the returning tail curve.
Enlarge this picture ↗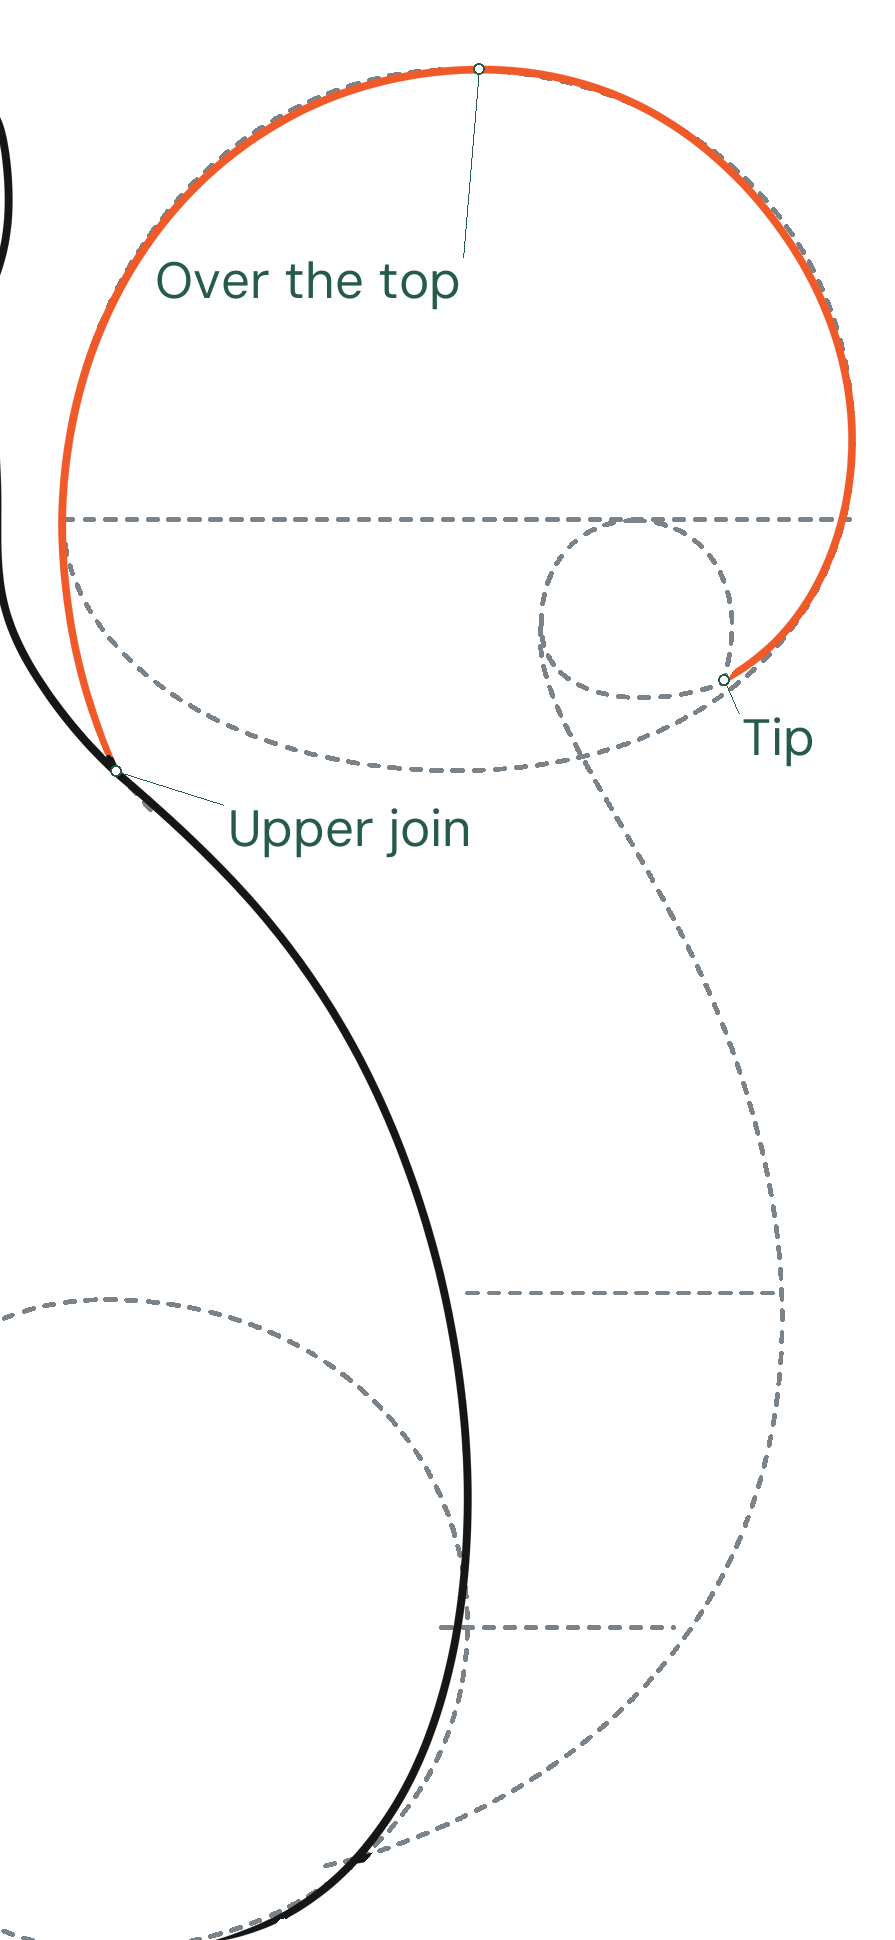
Sweep up and around the large oval
Start at the upper attachment. Curve left into the oval, travel over its top and down its right side. Stop at the marked tip beside the small notch oval. This is one outer sweep; do not close the large oval at the bottom.
Enlarge this picture ↗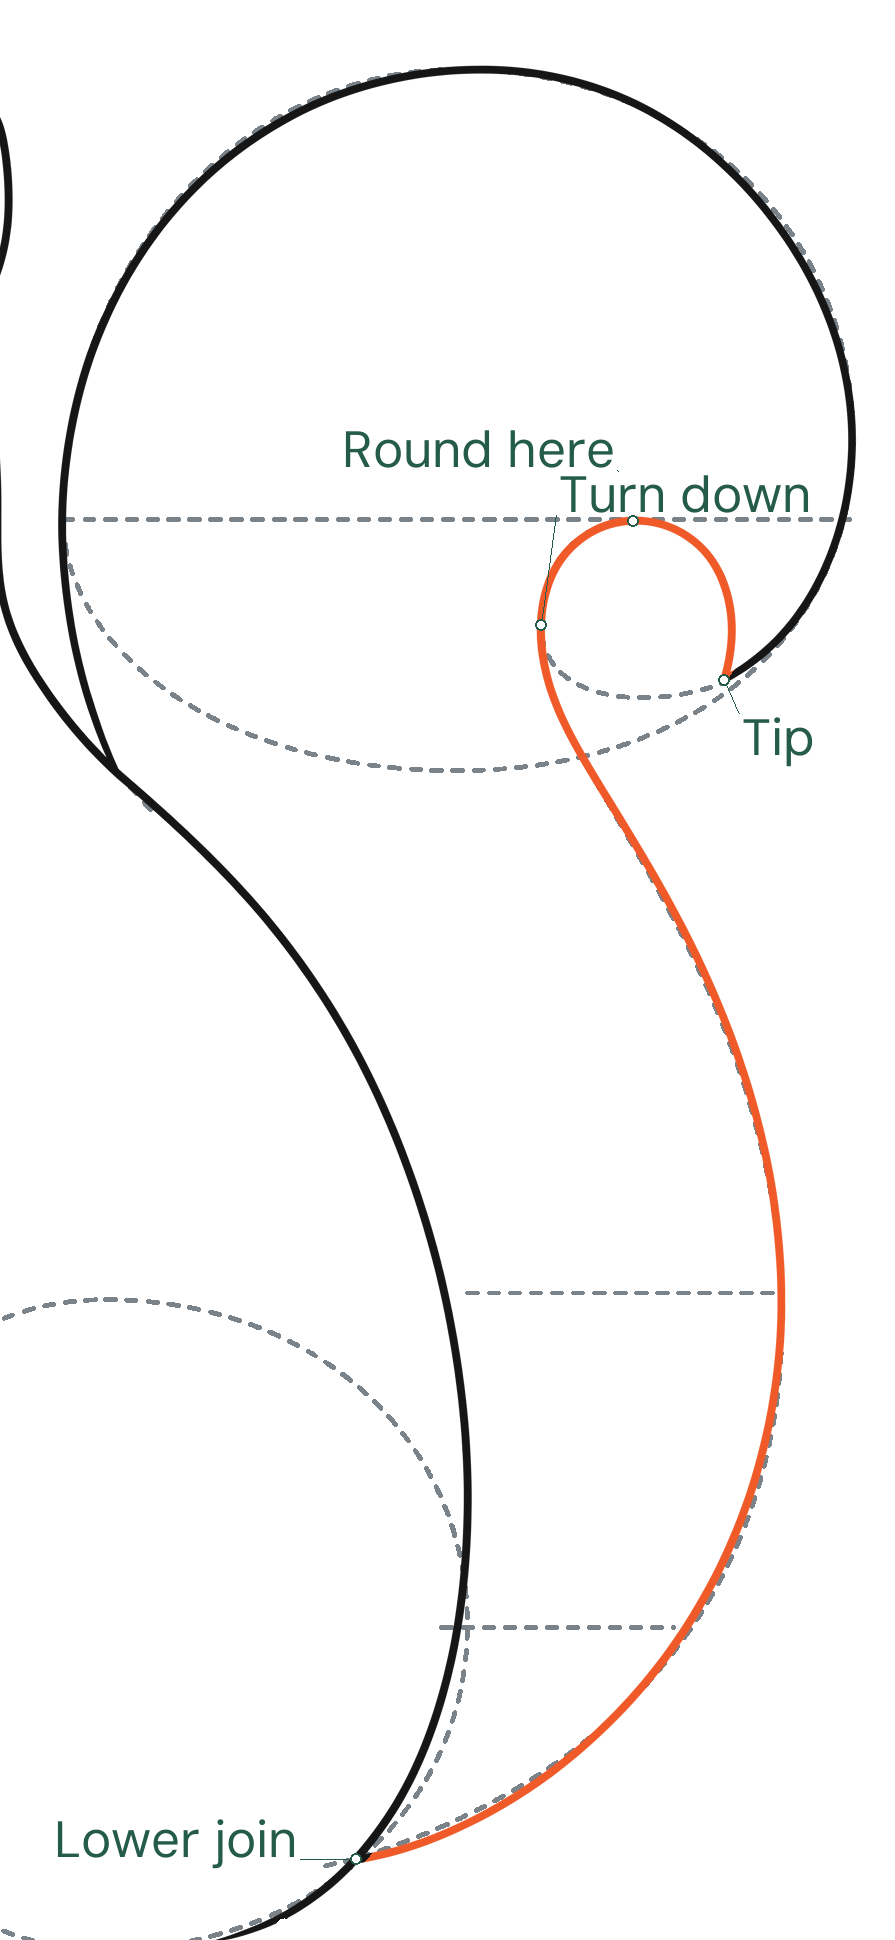
Round the notch and return to the lower join
From the tip, turn up around the right side of the small oval. Round its top, curve down its left side and follow the long bow to the lower attachment. The tip is a turning point, not a gap. Keep the back line in front of the tail.
Enlarge this picture ↗Tail-notch detail
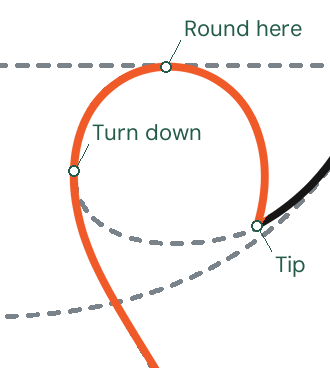
From the tip, round the small notch oval before following the long return. Keep the tip joined and the body line in front.
Before: clear the tail guides
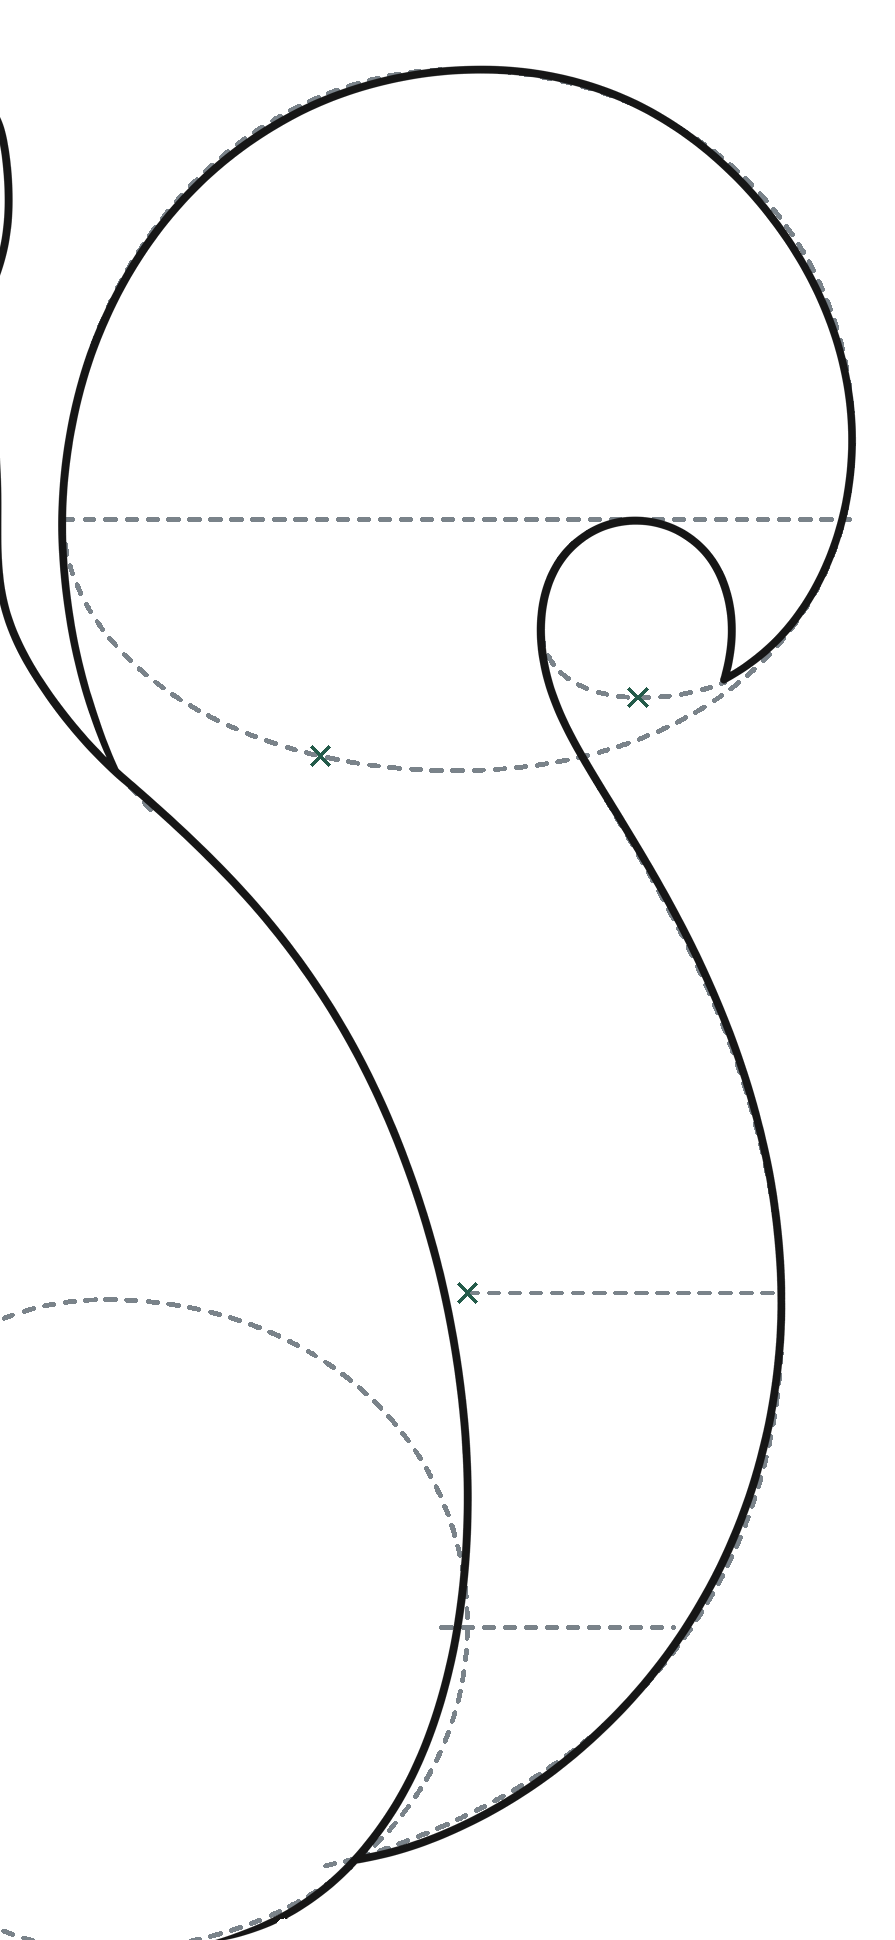
Erase the two complete planning ovals, the long bow, the short outer join guide and all three bars. Erase only the short dashed tails that continue behind the back at the two attachments. Keep the solid outer sweep, hooked return and body boundary.
Enlarge this picture ↗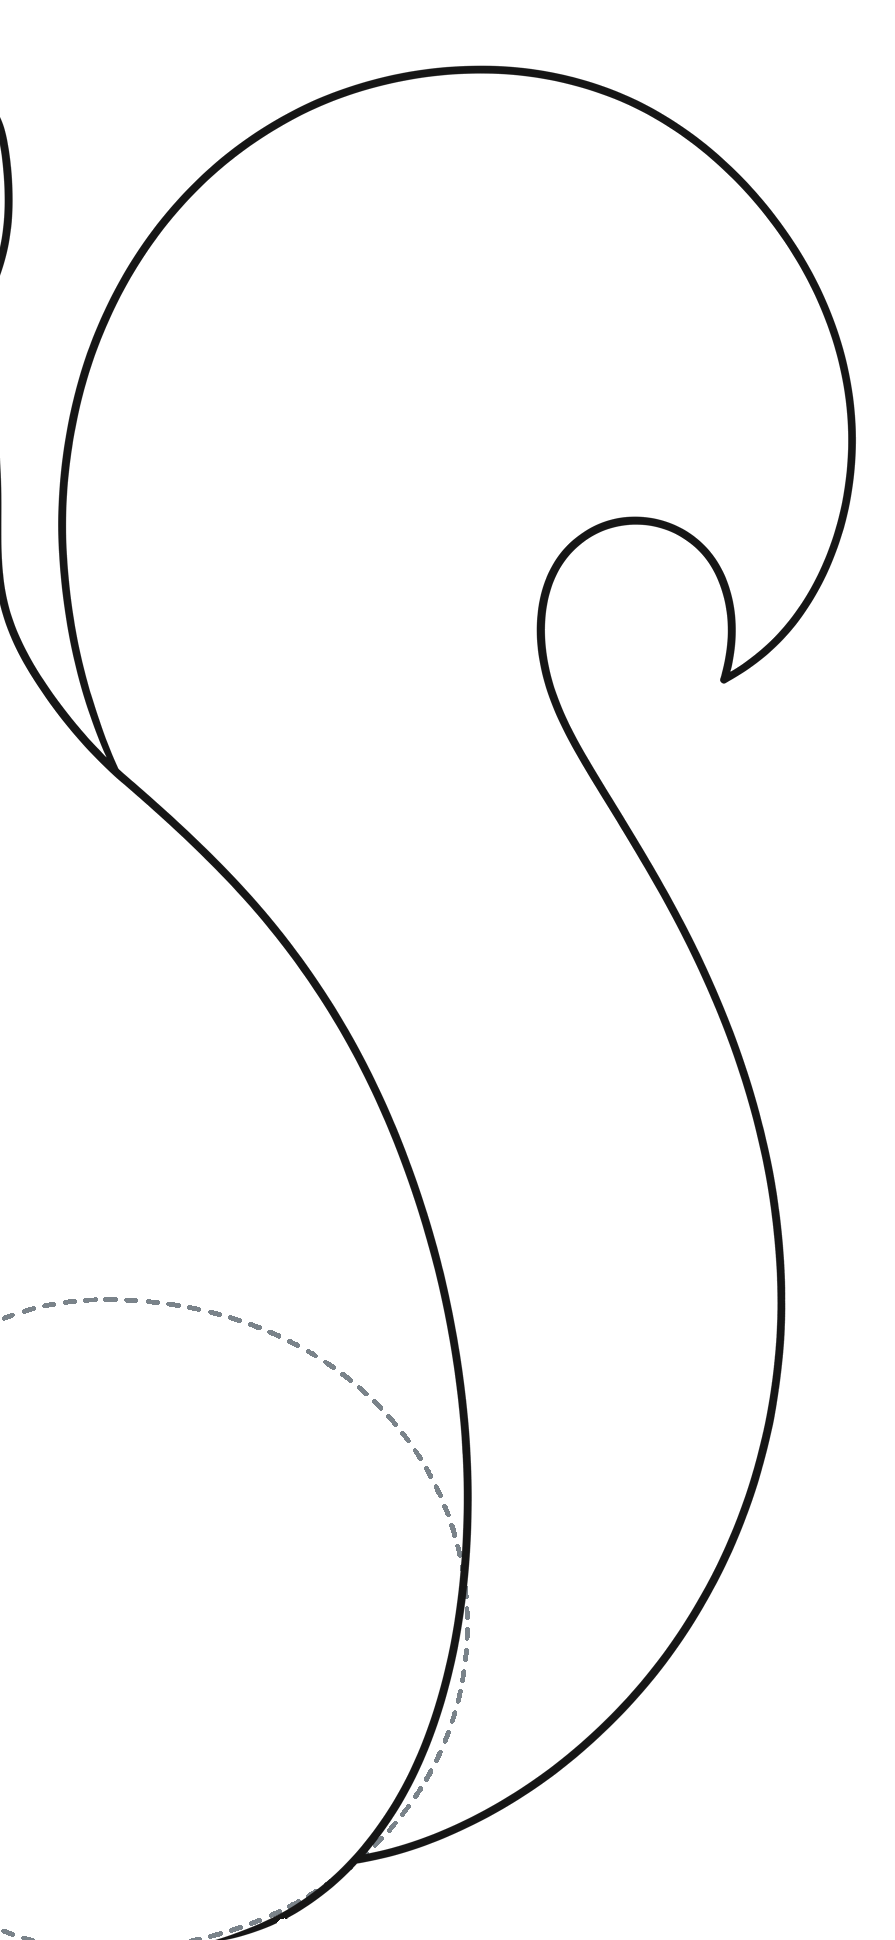
After: two joined edges, one hooked tail
The upper edge meets the back high up; the lower edge meets it beside the haunch. Both joins stay connected. The notch remains open white space, and the body line stays in front.
Enlarge this picture ↗Check: The tail meets the back at two different heights. Keep the white notch open and the body boundary in front.
Goal 6 of 6
Join the arms and feet
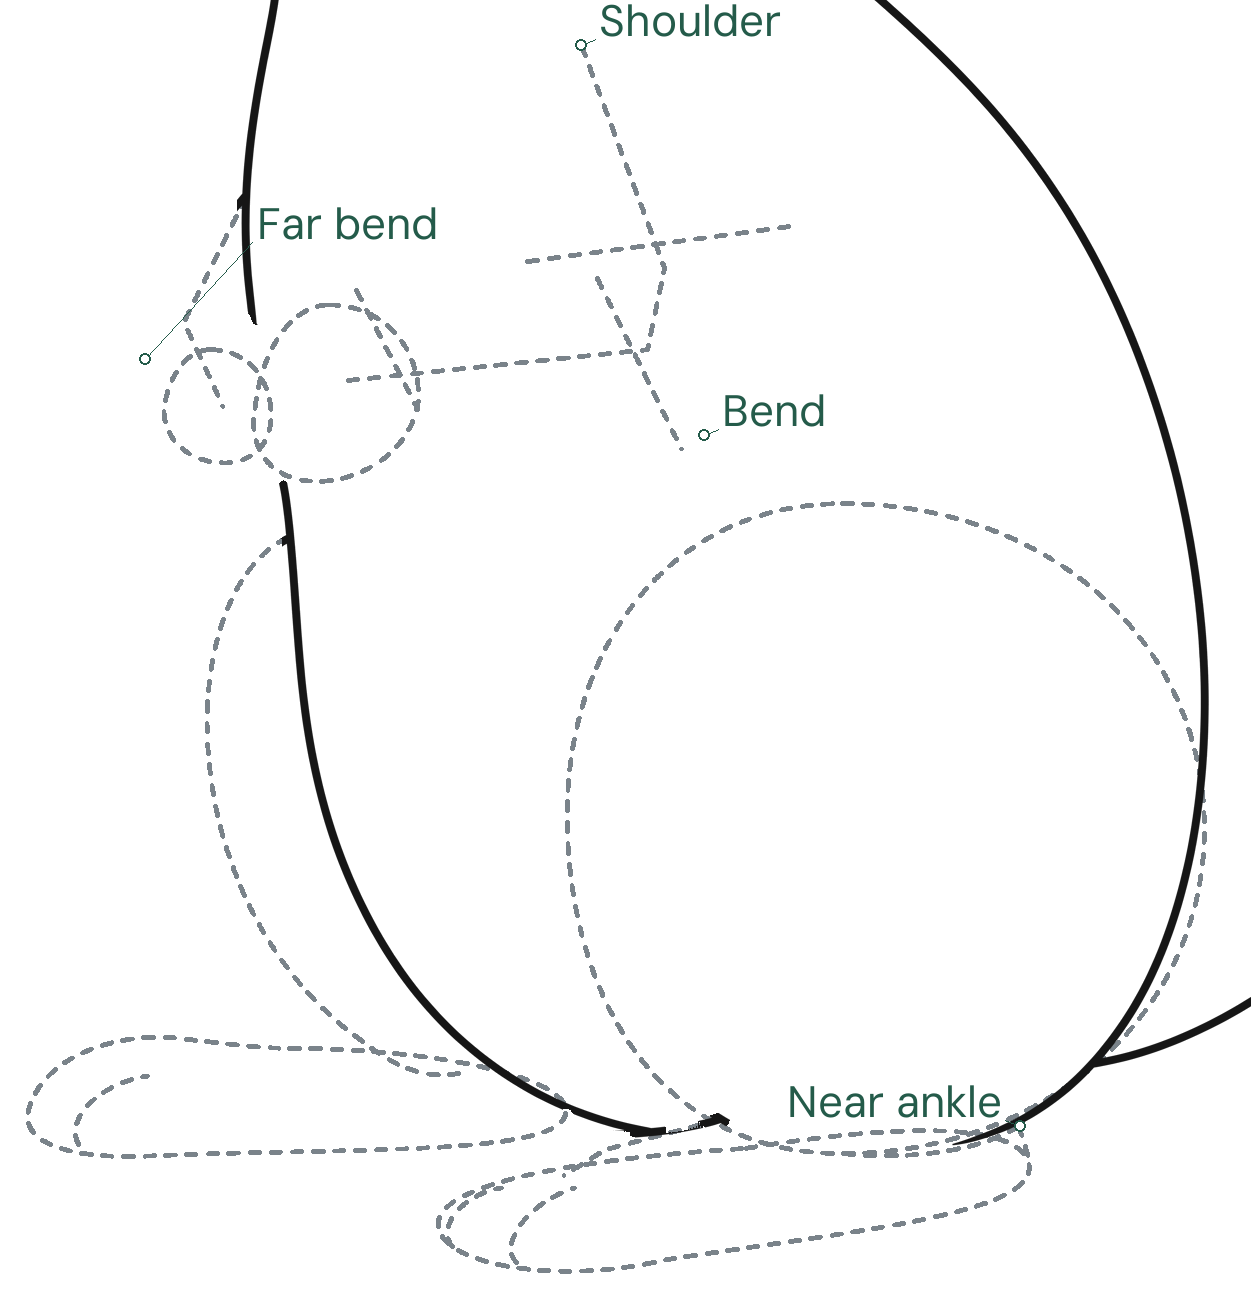
Place two arms, two paws and two feet
Draw bent arm middle lines and small paw ovals. Put the far paw slightly higher and left of the near paw. Add two long foot ovals below the body, with the shorter far foot behind the near one. Mark the light toe-turn curves inside them before drawing the feet. Keep the haunch oval.
Enlarge this picture ↗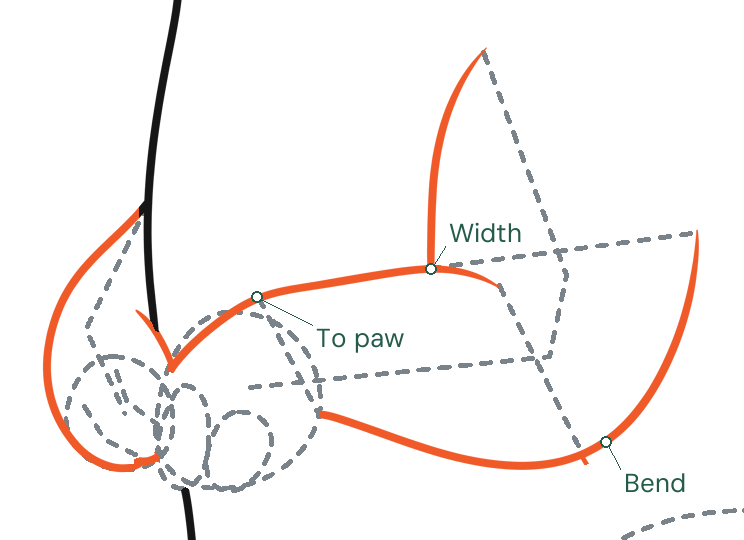
Wrap the arms and plan the finger turns
Use the width marks to round the near arm down to its elbow and back toward the paw oval. Round the shorter far arm, stopping at the near paw. Inside the near paw, add two narrow ovals for the finger turns. Put two short bent guides inside the far paw.
Enlarge this picture ↗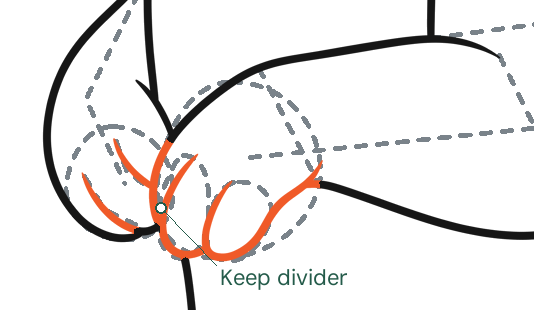
Round the paw ends and keep their dividing line
Follow the lower side of the first narrow oval down and back up to make a rounded finger. Repeat that turn around the next oval, joining the last curve to the arm. Round the two bent guides in the far paw. Keep the short boundary between the touching paws; their overlapping oval arcs will disappear at cleanup.
Enlarge this picture ↗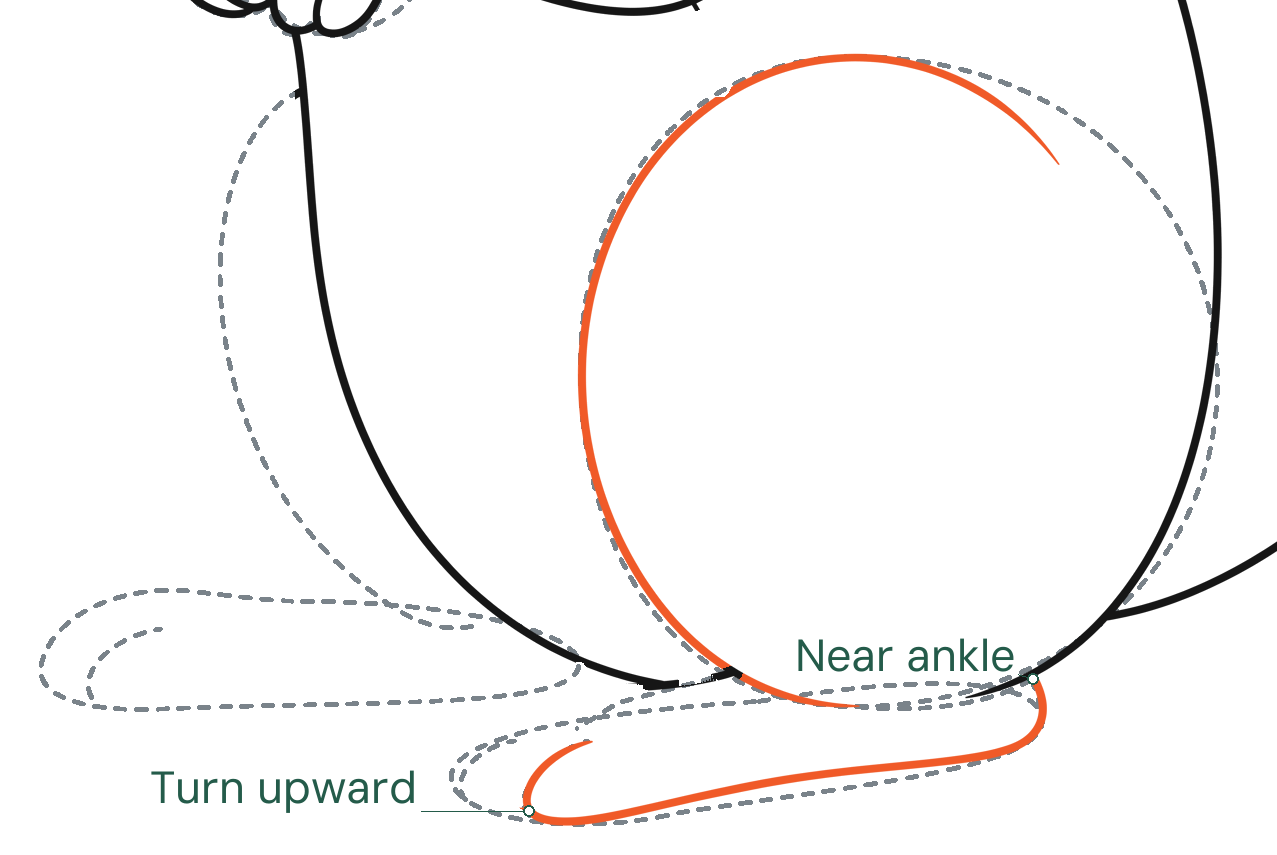
Join the haunch and make the first toe return
Follow the top and left of the haunch oval, leaving its lower-right part open. From the near ankle, curve around the heel and along the bottom of the foot oval. At the first toe guide, round the front end and turn back upward. Keep the other toe guides and the whole far-foot oval light for now.
Enlarge this picture ↗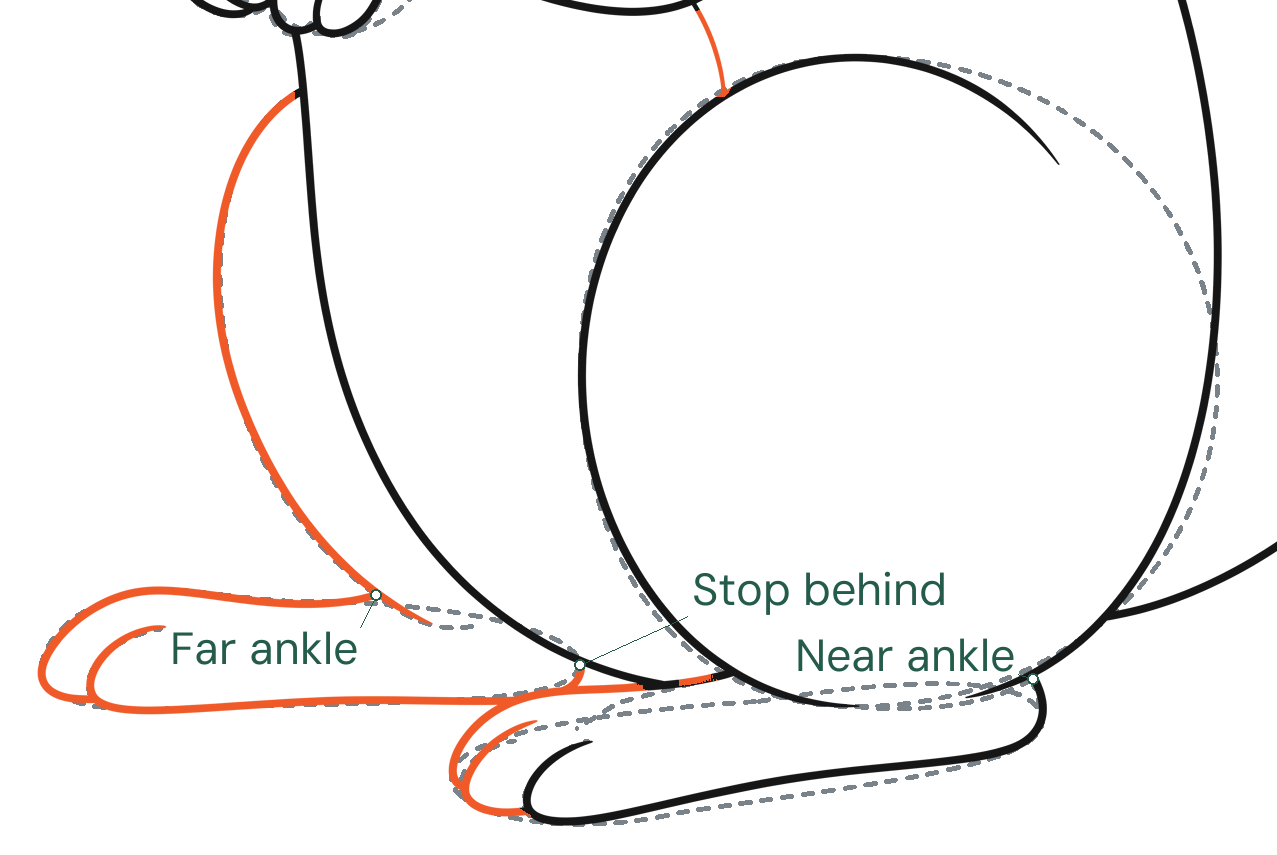
Repeat the toe turn and connect the far foot
Repeat that rounded return at the remaining near-toe guides. Join the upper foot curve to the haunch. Then follow the far-leg guide into its ankle and around the far-foot oval, using the same rounded turn at its toe. Stop the far foot at the marked overlap behind the near foot; do not draw its hidden edge through the front foot.
Enlarge this picture ↗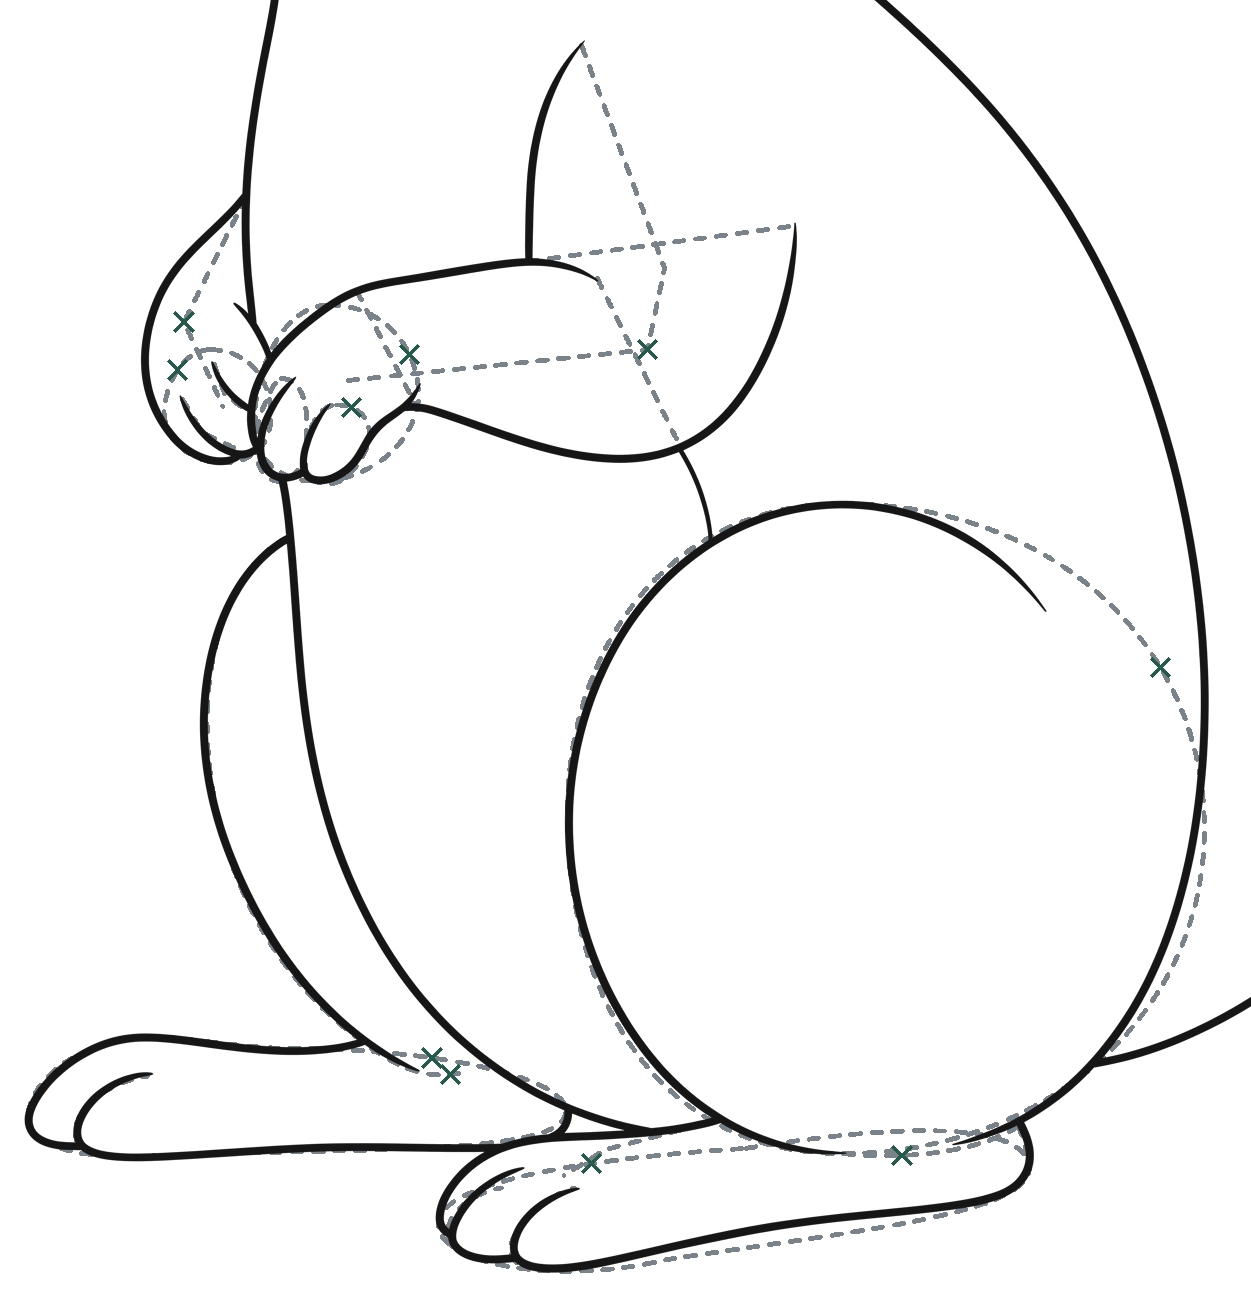
Before: clear only the limb guides
Erase the arm middle lines and width bars, the paw ovals and finger practice guides. Erase the foot ovals and ankle guides, the dashed far-leg oval, and the haunch oval where it is not a solid retained curve. Keep the paw divider, both ankles, the front foot edge and the visible haunch C.
Enlarge this picture ↗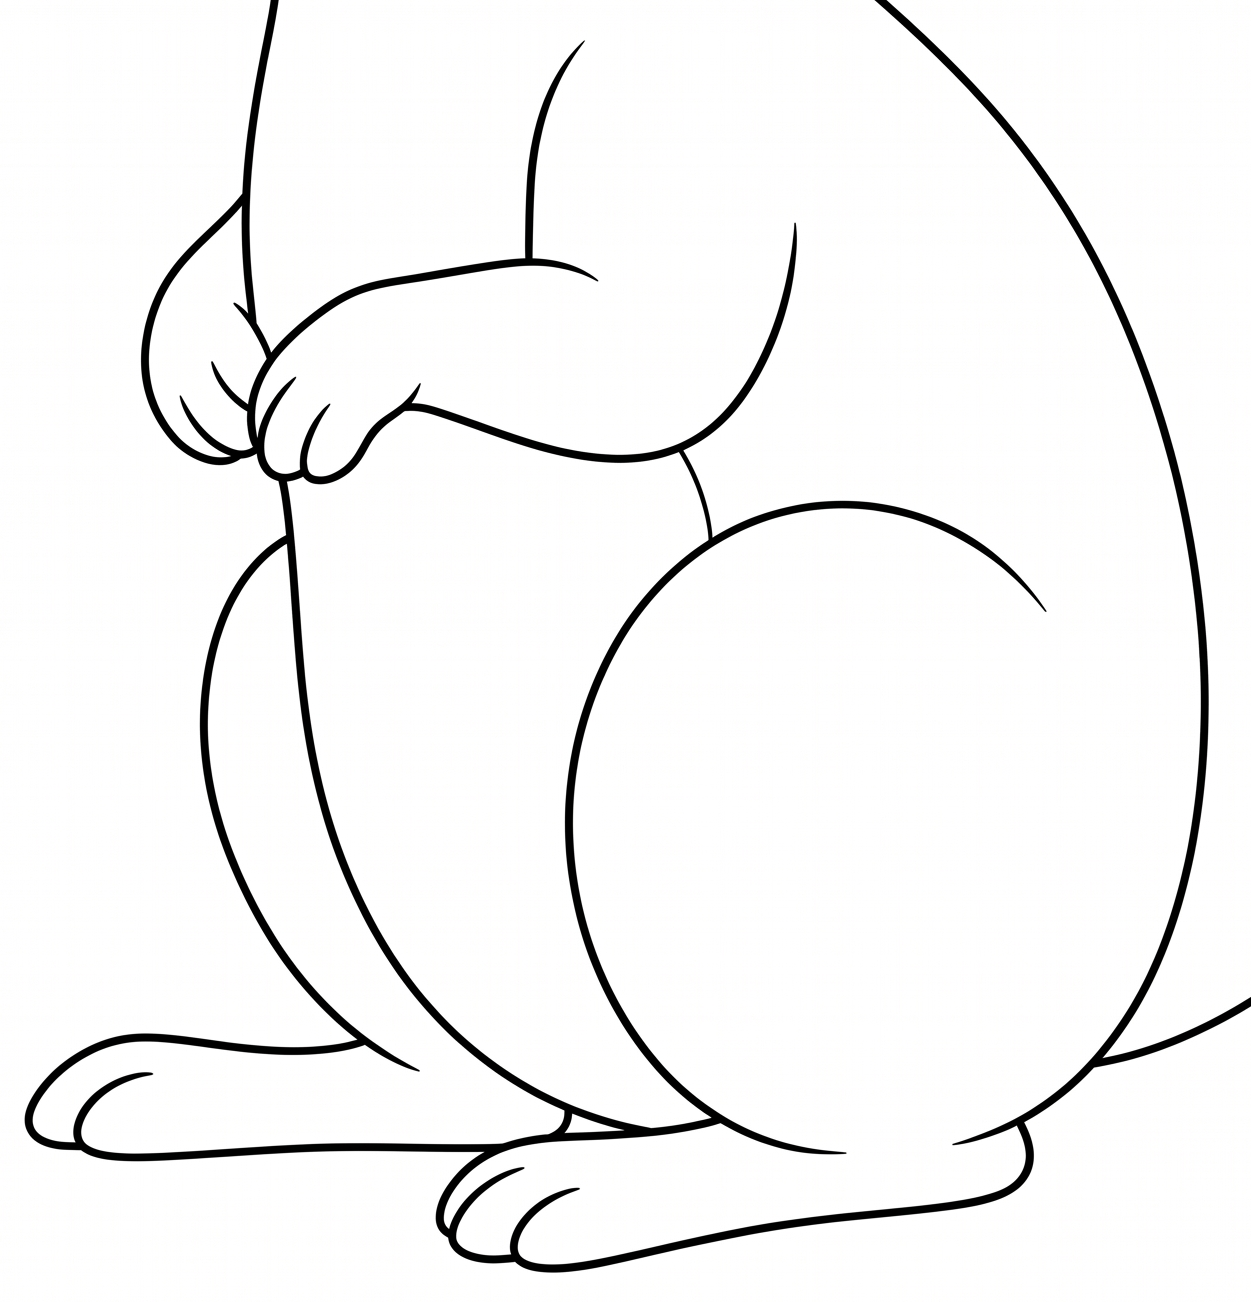
After: your squirrel line drawing is complete
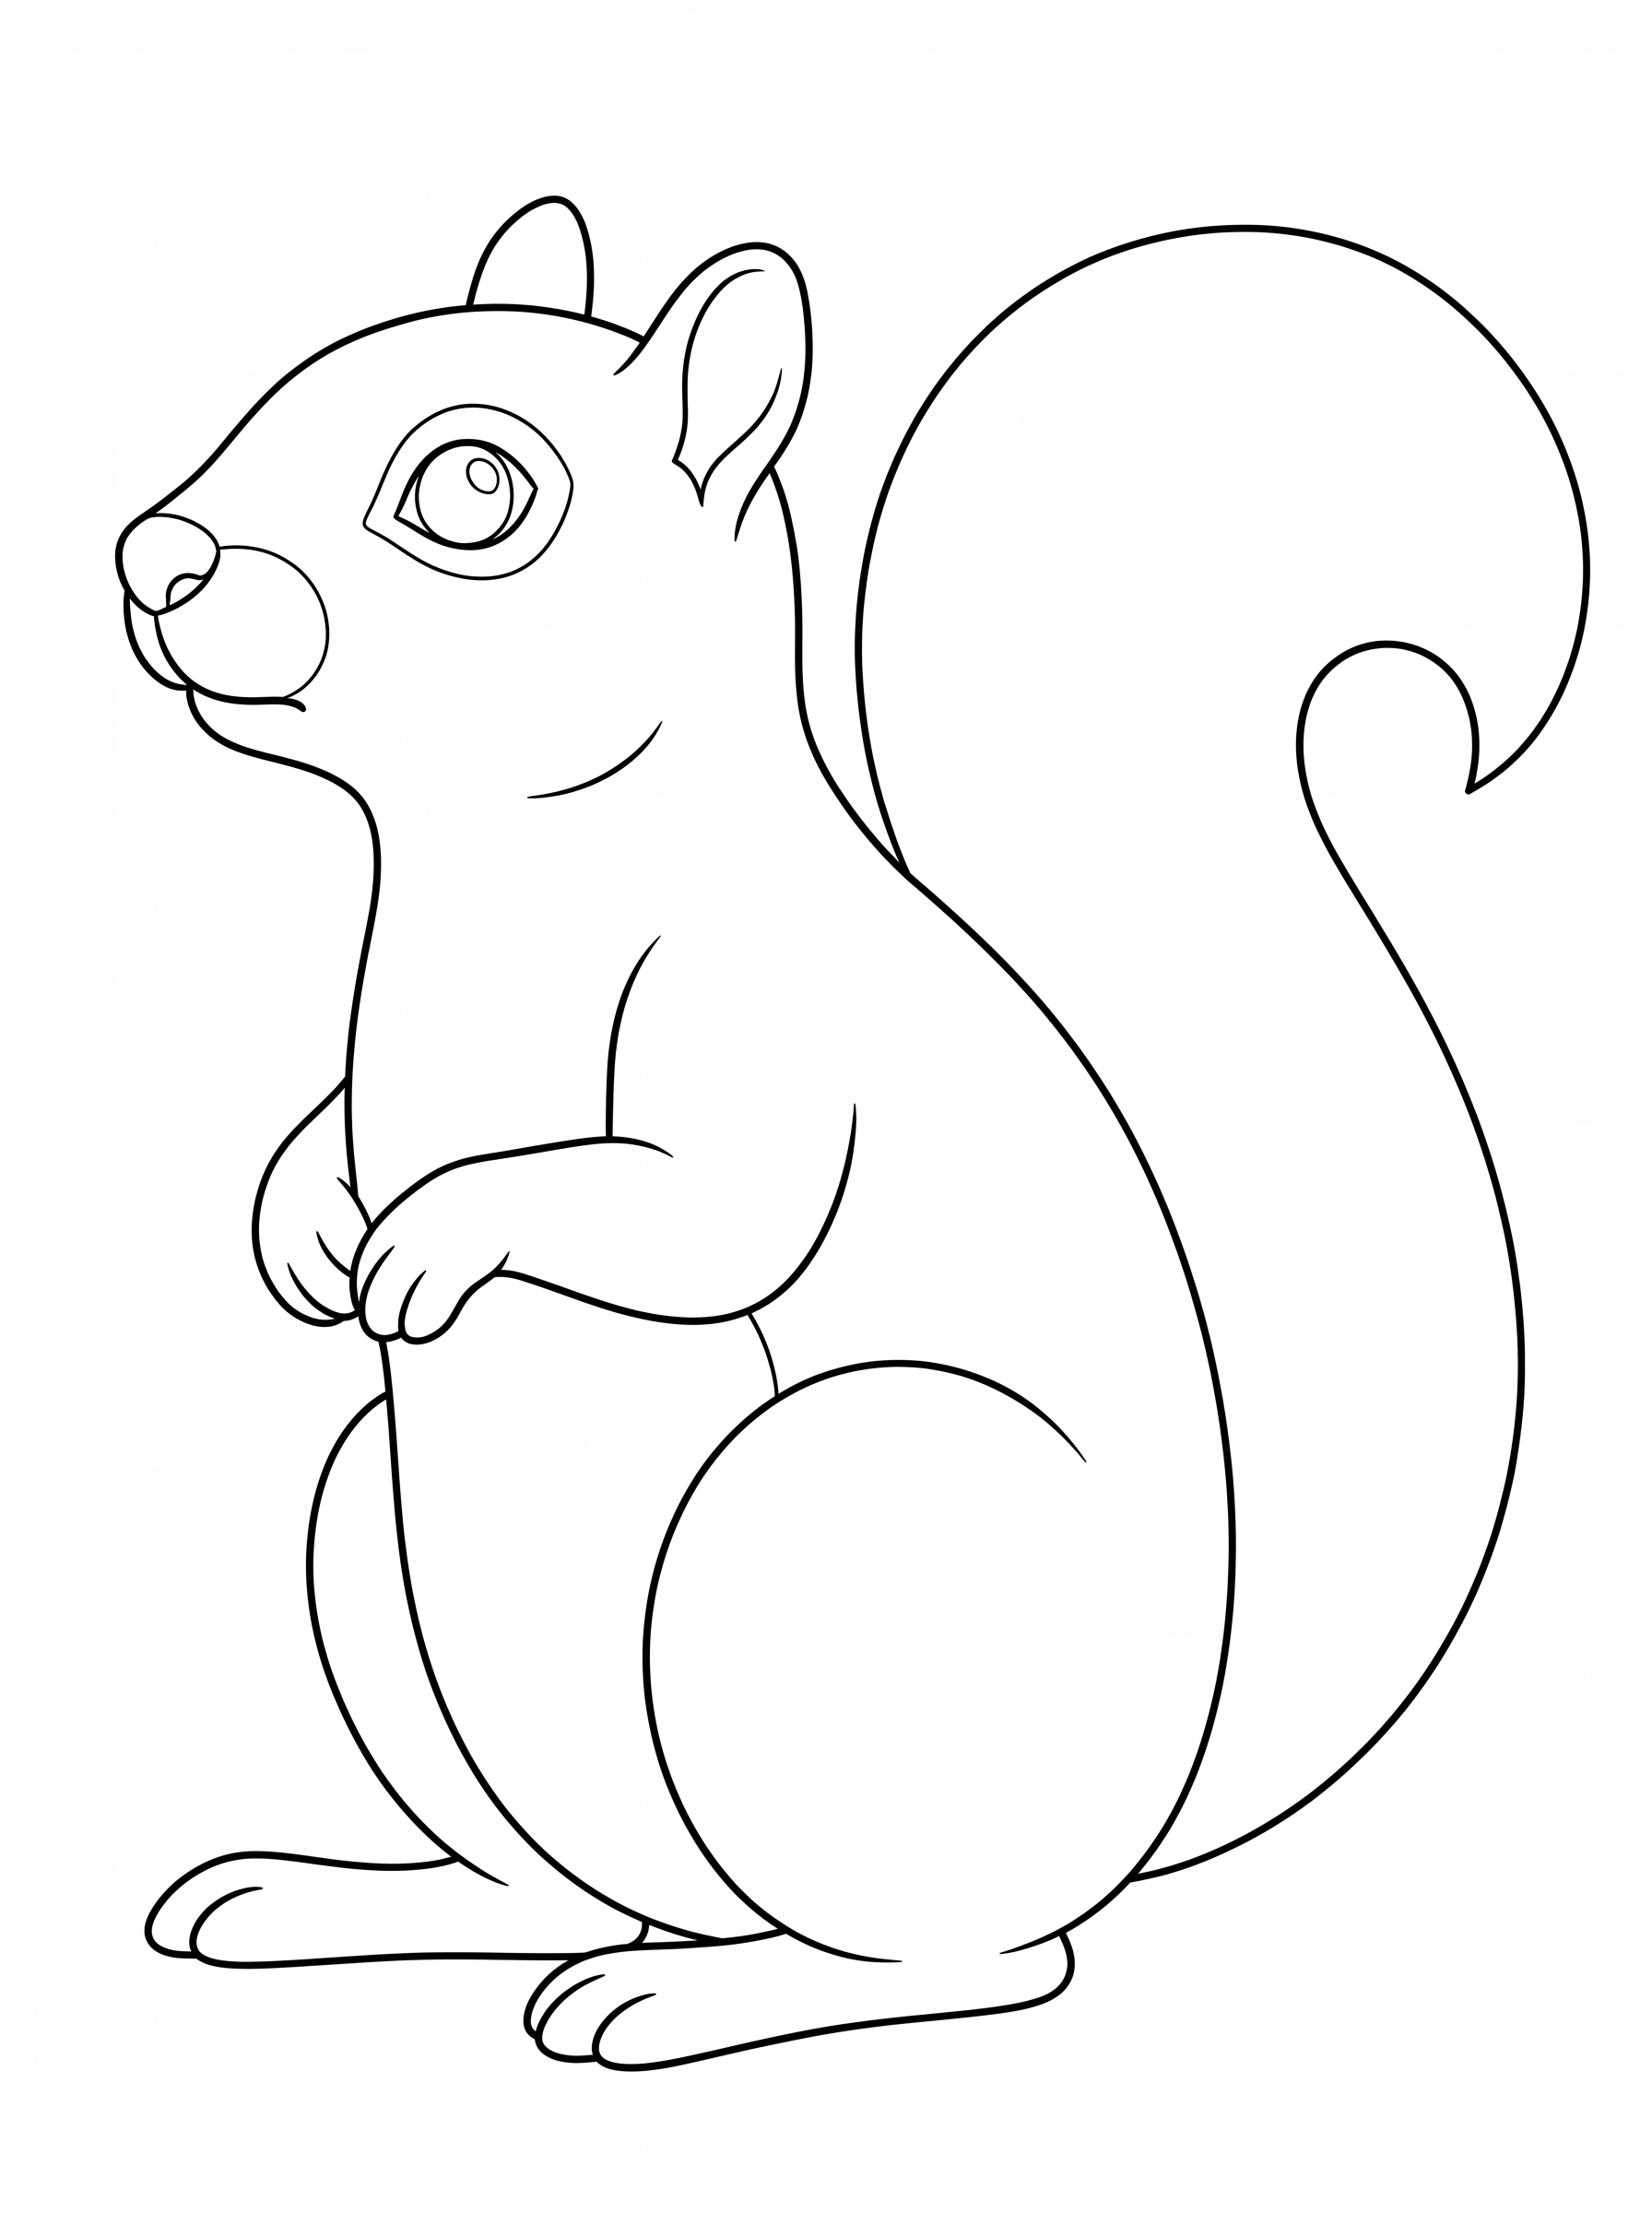
The head, torso, hooked tail, two forepaws and both hind feet are joined. All dashed guides are gone. Keep the near paw and foot in front, the tail attached at both marks, and the open spaces inside the ears and eye. Coloring or another try is your choice.
Enlarge this picture ↗Check: Both paws and feet are connected. Keep the near paw and foot in front, the haunch C and both tail joins; all dashed guides are gone.
Your squirrel line drawing is complete.
Your squirrel line drawing is complete when the body and tail join, both paws and feet are visible, and the light guides are gone. You can leave it as line art, choose your own colors, or try it again.
Finished squirrel with unequal ears, an unfilled nested eye, two forepaws, two hind feet and a tall hooked tail
Keep the open spaces inside the ears and eye. Coloring is your choice.
Enlarge this picture ↗Try with less help (optional)
Try placing just the head, body, haunch and tail-cap guides from the overview. Then check their relative size and the two tail joins before opening the detailed help.
A helper can point to an anchor or demonstrate on separate paper; the learner keeps control of their pencil.
Optional repair help
If a guide crosses the front muzzle
Keep the solid nose and front muzzle. Remove only the extra light arc inside the front form.
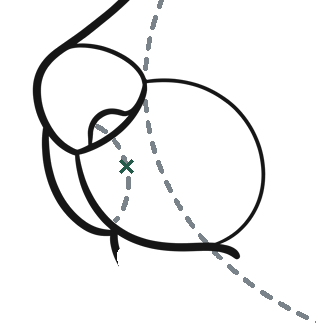
Find the extra line
If a light far-muzzle oval crosses the front muzzle, find only the dashed arc inside that front form. Keep the solid front edge. Keep the broad head oval: it is the longer dashed curve on the right.
Enlarge this picture ↗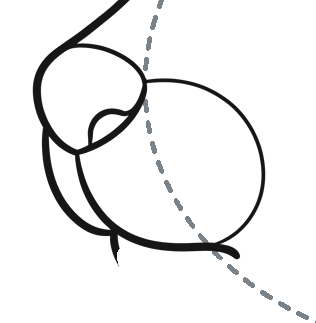
Remove just the hidden arc
Erase the marked guide arc and keep the exposed far crescent. The nose, muzzle and head stay in exactly the same position. Keep that head guide for placing the eye.
Enlarge this picture ↗If the lower tail join has a gap
Repair only the short join without moving the rest of your squirrel.
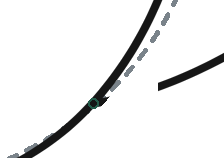
Find the short gap
The lower tail stops before the body. Keep the whole squirrel in place and find the marked lower attachment.
Enlarge this picture ↗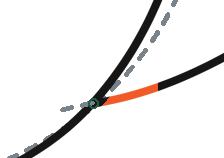
Restore only the short join
Continue this same lower tail curve to the original attachment. The short dashed continuation shows the part hidden behind the body.
Enlarge this picture ↗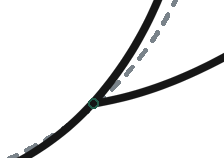
Erase the hidden continuation
Erase that dashed continuation. Keep the repaired tail edge and the body boundary in front. No other part has moved.
Enlarge this picture ↗Take the complete lesson with you.
Each detailed lesson PDF includes all six goals, the shape overview, two repair examples and an optional prompt for drawing with less help. Letter and A4 contain the same 22 pages. The phone PDF has eight scrolling pages.
For repeat practice: six checkpoints and reminders on one page. Use the detailed lesson for every construction action and close-up. The complete editions remain below.
Printing help
Choose US Letter for 8.5 × 11 inch paper or A4 for 210 × 297 mm. Print at Actual Size / 100%, or use Fit if your printer needs more margin.
Read the printing guide →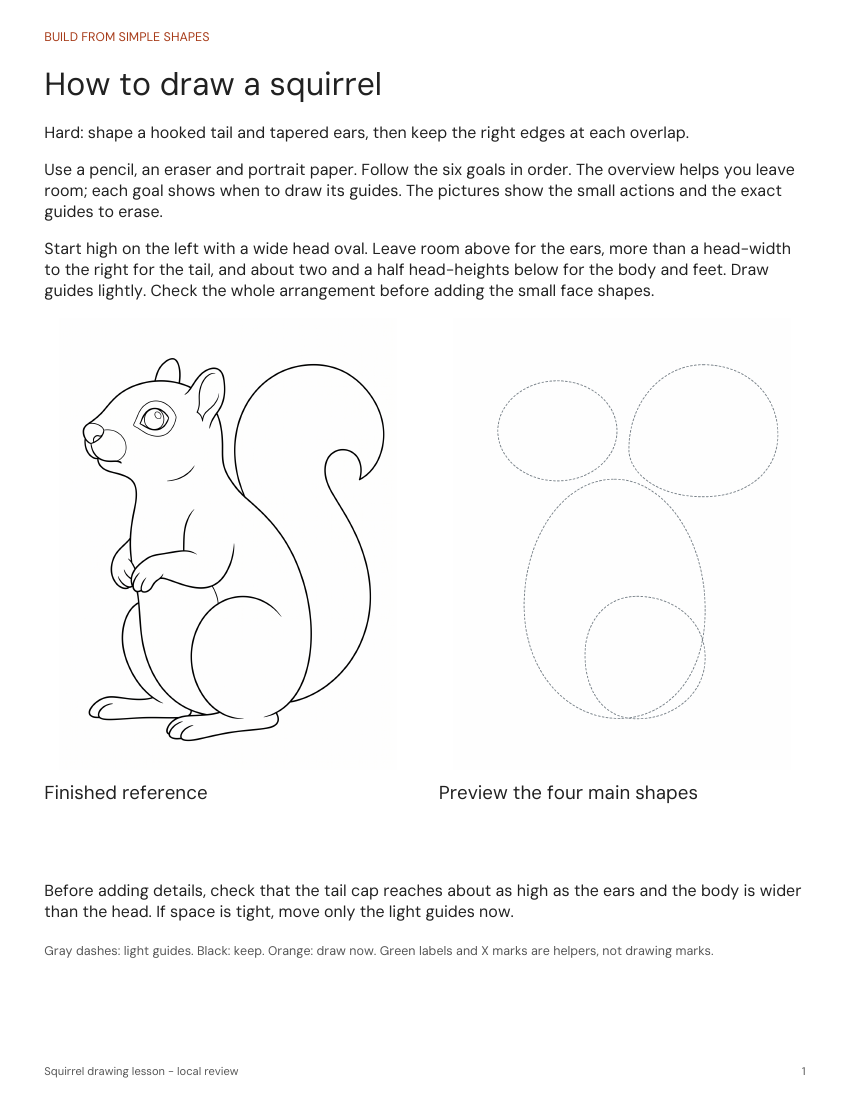 See the printable lesson ↗